Frequently Asked Questions

StellarMate FAQ
What is StellarMate?
StellarMate is a small mobile astronomy gadget that you can connect your astronomy devices to. It enables you to control your mount, camera, focuser, filter wheel, dome, and many more devices. Designed for astrophotgorahy, it includes free powerful astrophotography tool that supports mount control, batch capture, autofocus, autoguide, and astrometry.
How does it work?
The gadget include several methods that enables you to connect your equipment. StellarMate communication channels include 4x USB 2.0 ports, 10/100 MBPS Ethernet, 802.11n Wireless LAN, and Bluetooth 4.0. You connect your equipment to StellarMate using any of the supported communication channels. Once connected, you can use a mobile (Phone & Tablet) or desktop (Windows, MacOS, Linux) application to control your equipment.
Which Raspberry PI is compatible with StellarMate?
How do I connect to StellarMate?
You can connect to StellarMate via the following methods:
- Direct Connection: Plug the supplied HDMI cable to a monitor to gain direct access to StellarMate OS. You also need to plug your Mouse & Keyboard.
- Wired: Connect StellarMate to your LAN via Ethernet. You can access it like any other device on your network. You can use Network Discovery tools on your operating system (e.g. Avahi/Bonjour). to detect it as it advertises its services over the network.
- Wireless: Use StellarMate App for Android and iOS to connect to your gadget.
How can I upgrade StellarMate OS to 2.0?
It's not possible. StellarMate OS is a completely new unified OS for Raspberry PI and Mini PCs. It must be downloaded and reflashed to to the system.
What’s new in v2.0?
- Atomic Updates: safer, smoother system upgrades
- Integrity Checks: enhanced reliability and protection
- Native NVMe & SD Card GUI Installer: easy graphical installation
- Rolling OS with Latest Updates: always up-to-date
- Snapshots & Rollbacks: restore your system instantly if needed
- Flatpak Stable + Nightly Support: more flexibility for apps and testing
StellarMate OS v2.0 is not a free upgrade for existing users, however all current customers will receive a 20% discount as a token of appreciation for your valued support!
StellarMate Pro & StellarMate X Astrophotography Controllers customers can upgrade to SM OS 2.0 for free by downloading it from the orders page.
What is the maximum SD card size I can use with StellarMate OS?
The maximum reported SD card size is 128GB.
Make sure to use a reputable class 10+ SD card.
What programs can be used to control StellarMate?
There are many mobile and desktop applications that you can use to control StellarMate. For a complete list, please check INDI Clients page.
However, only Ekos and StellarMate App are officially supported.
What is the default username and password for StellarMate OS?
username: stellarmate
password: smate
How can I reset WiFi? How can I reset to Factory Defaults?
To reset StellarMate, go to the StellarMate Control Panel (stellarmate.local) and click on the Diagnostics icon on the side menu as illustrated below:
After clicking the icon, the diagnostics tab will open with lots of options, including:
- Reset Network: Click this button to reset WiFi settings in case you have issues accessing the unit via WiFi or HotSpot. It will restore StellarMate to HotSpot mode.
- Reset Factory: Click this button to reset all settings, including WiFi. This action is irreversible! Please make sure to back up any important data on the SD card!
StellarMate must now be restarted for the above to take effect.
You can also use the StellarMate Tools app available in SM Desktop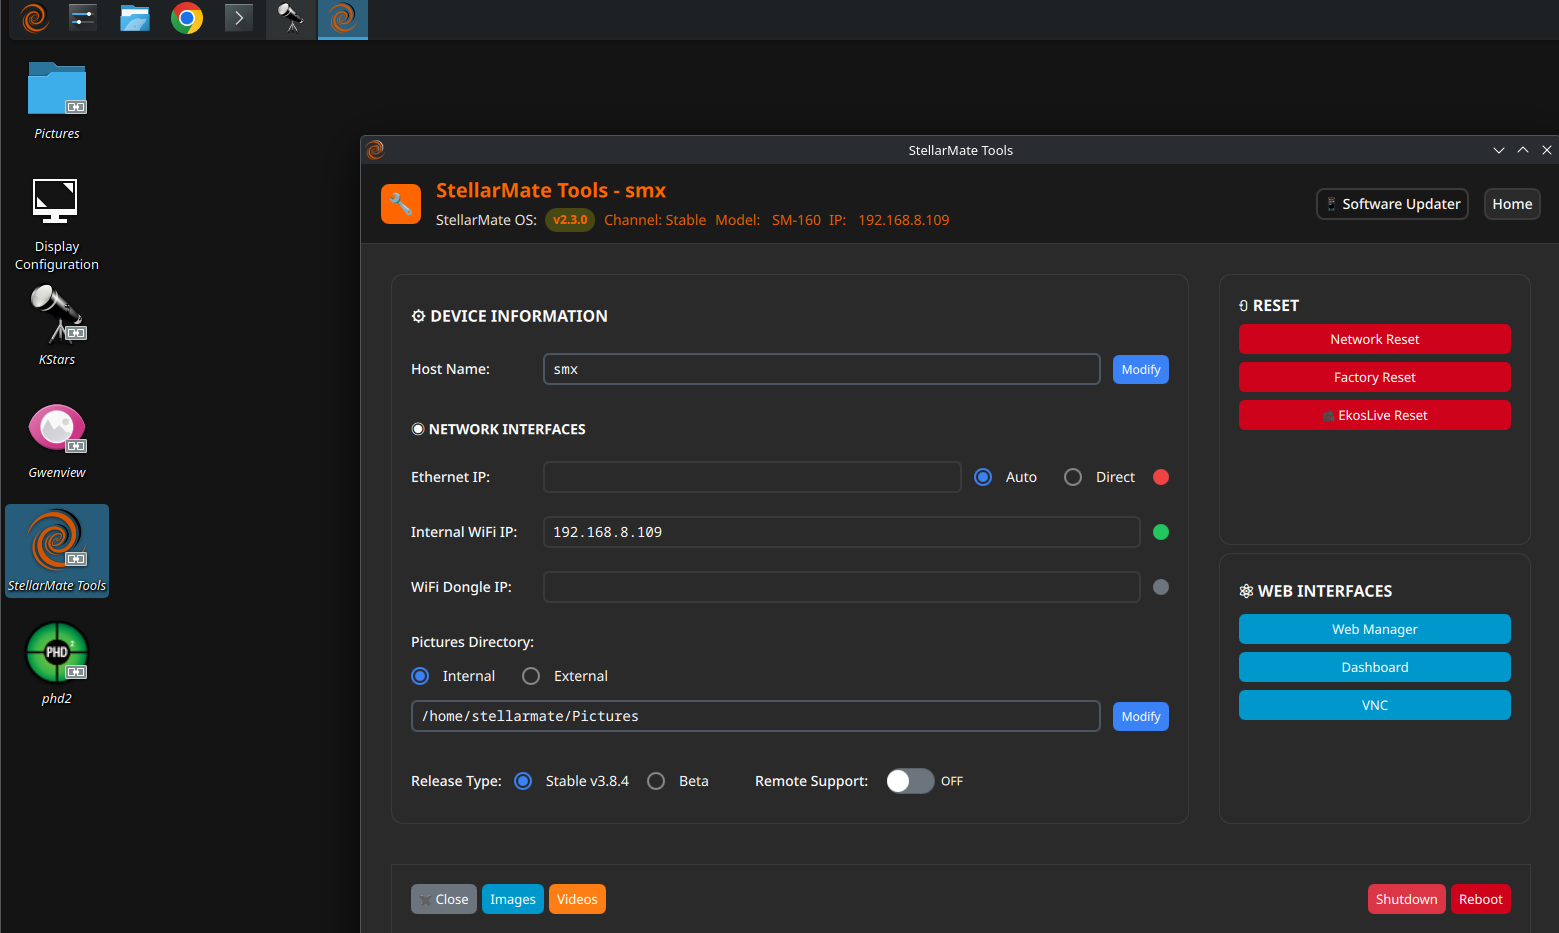
If you have trouble connecting StellarMate to your router via WiFi, please access your router and clear all cache and any entries for StellarMate.
Why is the WiFi Hotspot slow or unreliable?
The StellarMate WiFi Hotspot by default operates at 5Ghz. While this offers better speed, it offers relatively shorter distances compared to 2.4Ghz. You can use the StellarMate App to switch the default Hotspot Frequency (2.4Ghz or 5Ghz) and select the channel (in case of channel congestion). As with any WiFi-enabled device, the signal strength and reliability can be affected by several factors:
1. Power Supply: For StellarMate running on Raspberry Pis, you need to use a 3A+ 5V power supply (3 Amperes or higher) in order to properly operate the OS. Anything less than 3A could result in system instabilities and possible corruption. To solve this problem, invest in a reputable power supply before you boot StellarMate OS. For StellarMate Pro and StellarMate X controllers, the official power supply is suffcient.
2. Congestion: if there are many WiFi Networks in the area surrounding StellarMate, the WiFi Hotspot might be slow due to signal and channel congestion. A possible solution in case of severe interference is to toggle WiFi frequency (2.4Ghz/5Ghz) in StellarMate OS and try to locate a channel that is relatively free of congestion.
3. Obstructions: If you used a metal case for StellarMate or the unit is attached to a metal surface, this can attenuate the signal. Try to keep StellarMate separate from any nearby metallic objects.
4. USB 3.0: There is a known issue with USB 3.0 ports causing significant interference with 2.4Ghz signals. If an active USB 3.0 port is used by any peripheral, it may lead to signal degradation. There are two methods to resolve this issue:
4.1 Connect USB 3.0 peripherals to the StellarMate USB 2.0 port
4.2 Switch StellarMate OS WiFi HotSpot Frequency to the 5 GHz range, which is immune to this interference from USB 3.0.
5. HDMI Resolution: If you connect StellarMate to an external display using an HDMI cable, then high resolution is known to cause interference with WiFi. Try to lower the HDMI resolution to improve the situation.
If none of the above solutions work, another possible solution is to try using a Wired Connection using an Ethernet Cable. This can be achieved via a direct Ethernet connection between StellarMate and your PC/Mac, or via a router. It is a last-resort solution but is known to be reliable and almost 10 times faster than WiFi.
What is the default password for StellarMate WiFi HotSpot? How to change?
StellarMate WiFi HotSpot password: stellar@mate
To change default password, follow the steps in this vide:
Where do I download StellarMate OS?
After you purchase StellarMate OS, you should receive a confirmation email with links to the downloads. In the future, if you want to download StellarMate OS again, make sure you are logged in to the stellarmate.com website and then go to the Orders page.
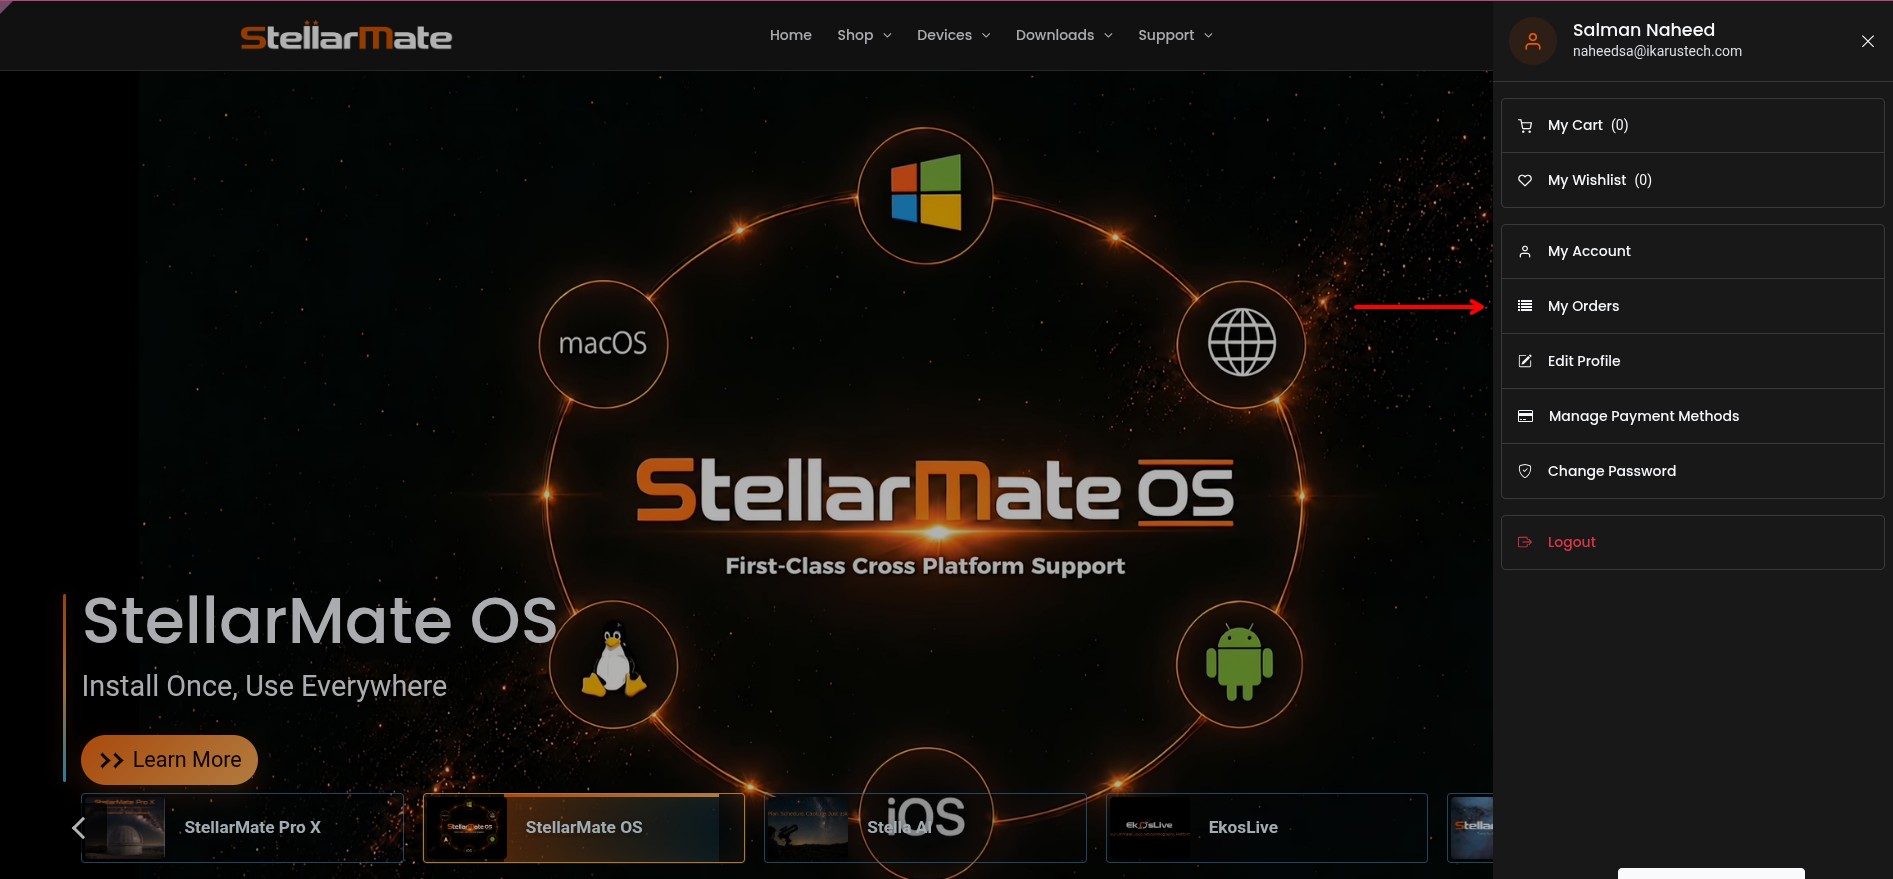
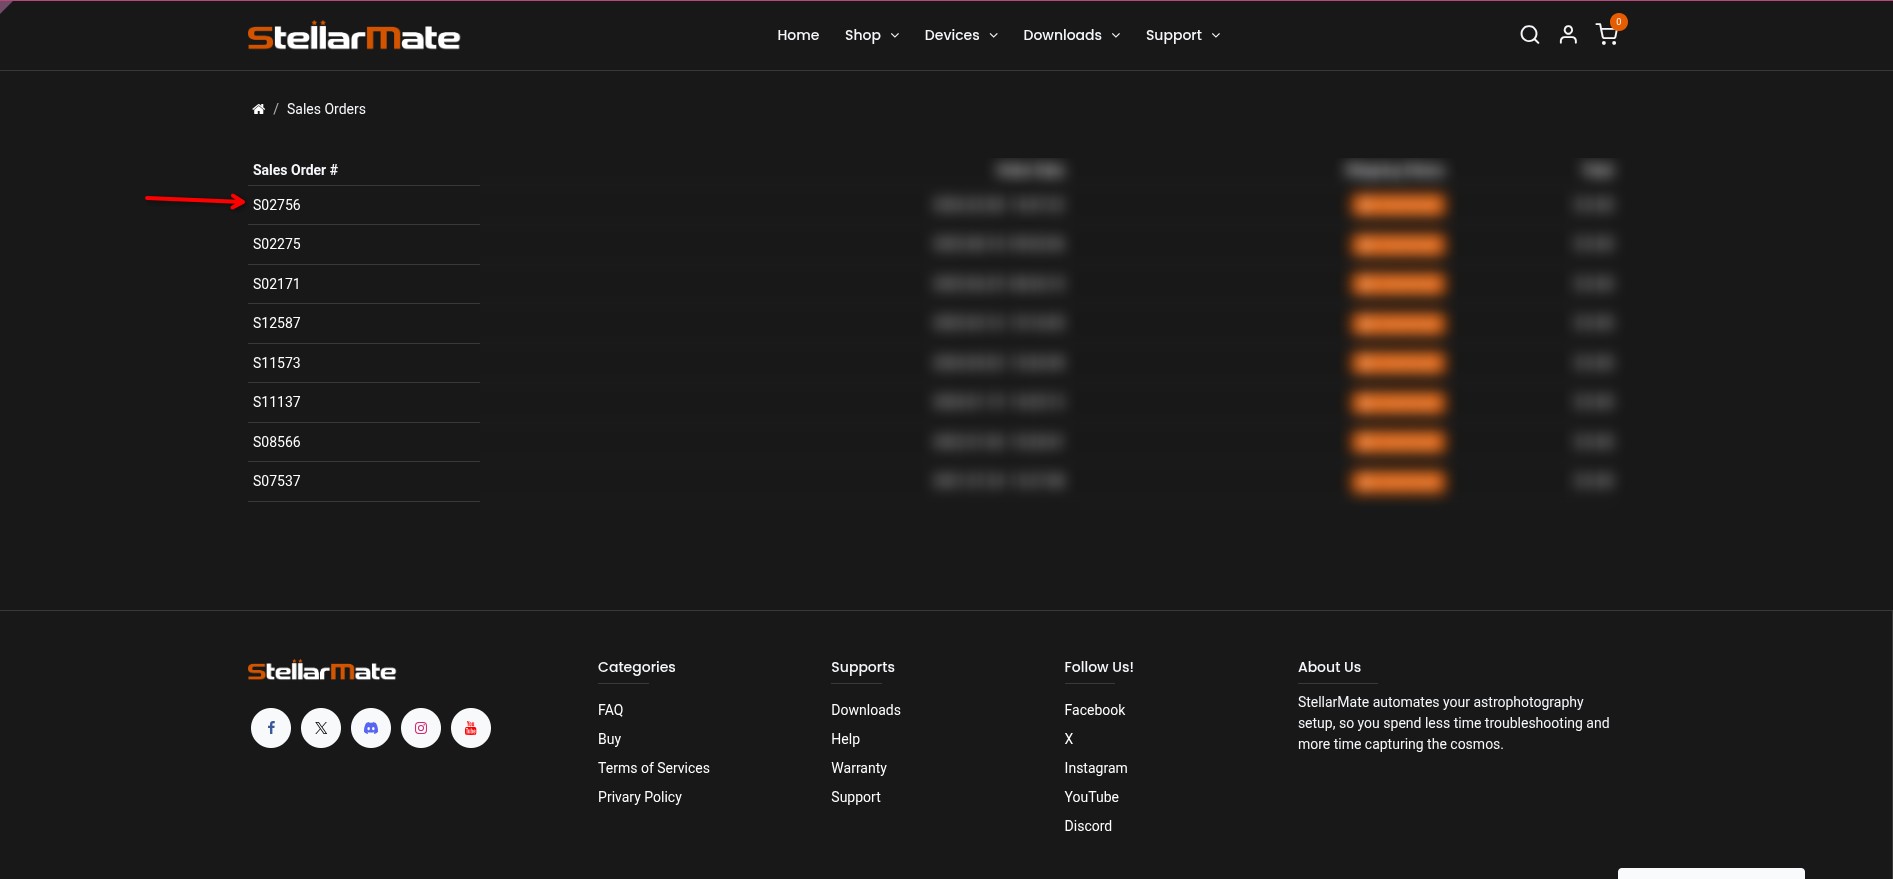
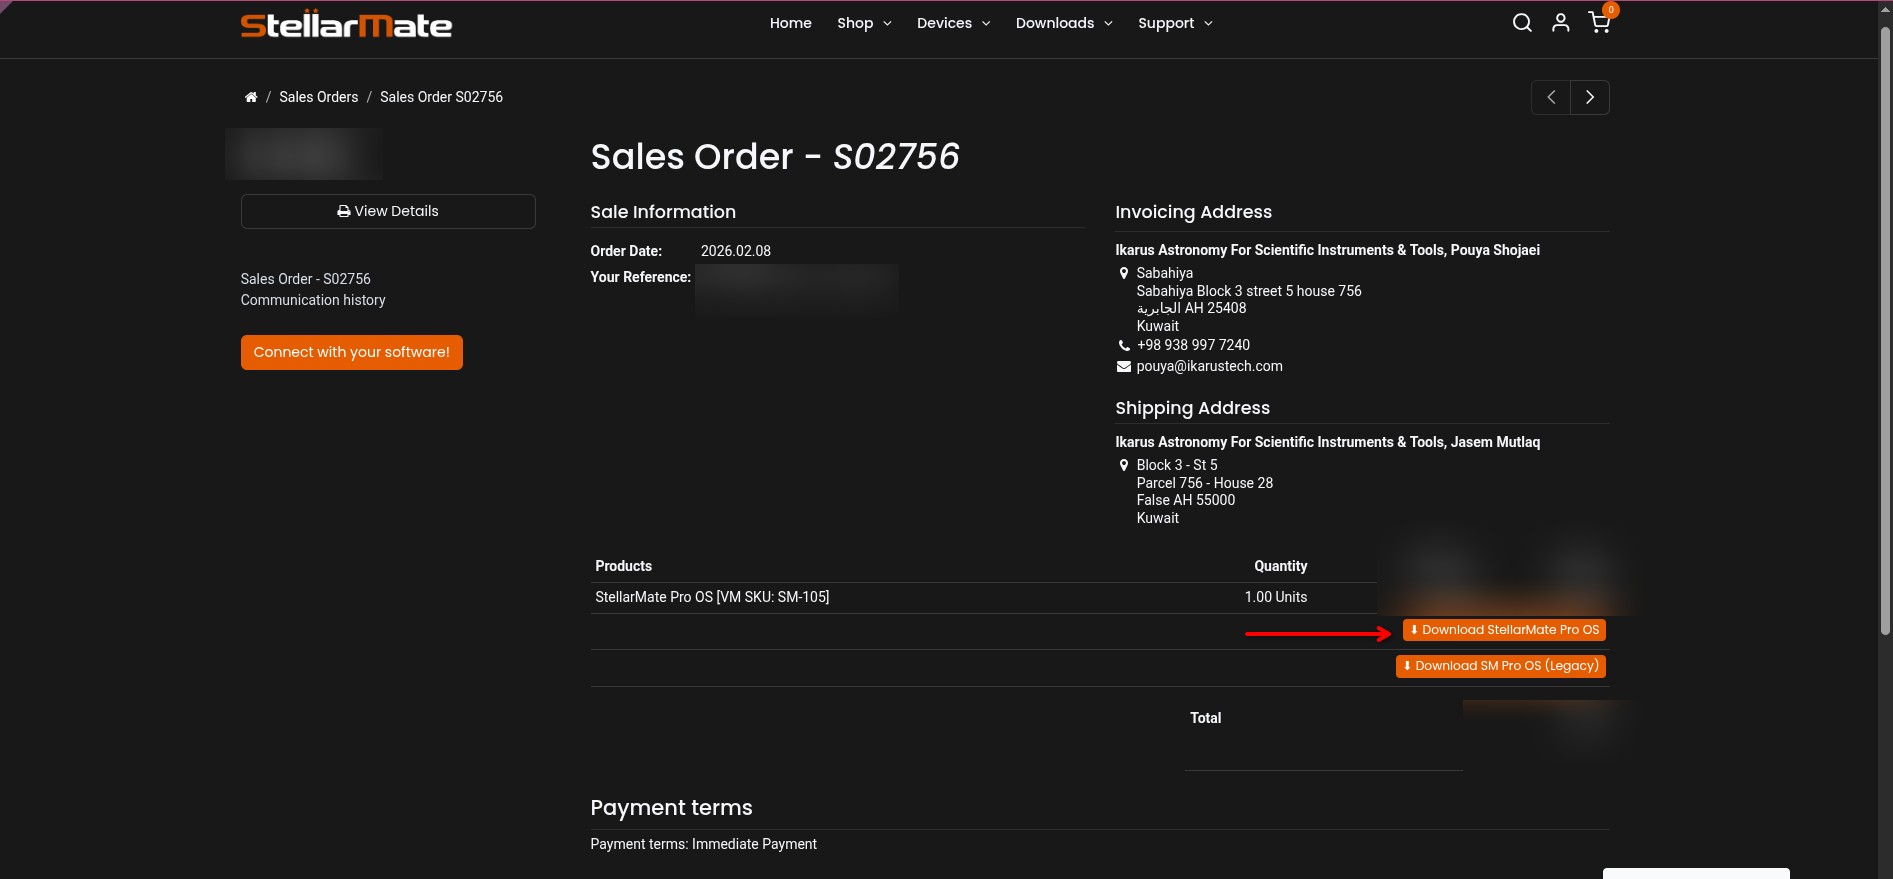
You should see a list of your orders. Click on your order link, then scroll down to see the downloads. Make sure to download the SM OS version appropriate for your hardware platform.
In case you have an issue with flashing the image with Raspberry PI imager, please follow these steps:
- Using the Raspberry Pi Imager, install Misc Utility Images -> Bootloader -> SD Card Boot.
- Move the card to the RP and boot, then power off and remove the card.
- Erase the card using Raspberry Pi Imager, remove the card from the computer, and insert it again.
- Using Raspberry Pi Imager, install the StellarMate image.
What do I need to run StellarMate?
You need equipment (Mounts, Cameras, Focuser...etc) that can be connected to a computer via either USB, Bluetooth, or Ethernet. All modern gadget include connectors to computers. For mount with Serial connectors, you will need to purchase a Serial-2-USB adapter. Since StellarMate uses INDI for device control, you need to make sure your device is supported. While not strictly required, it is highly recommended to use an external powered USB hub to connect your devices to.
To use the StellarMate App, you need either an Android- or iOS-based smartphone.
How do I figure out StellarMate hostname?
By default, the unit hostname is stellarmate.local
From StellarMate App, go to My Mates then select your unit. The hostname is the unit name. If you changed the unit name, then just use the name followed by .local
For example, if you changed the unit name to observatory, then your new hostname is observatory.local
Another way to find the hostname is to open the Web Manager from the StellarMate App, and you will see the unit hostname in the browser address bar.
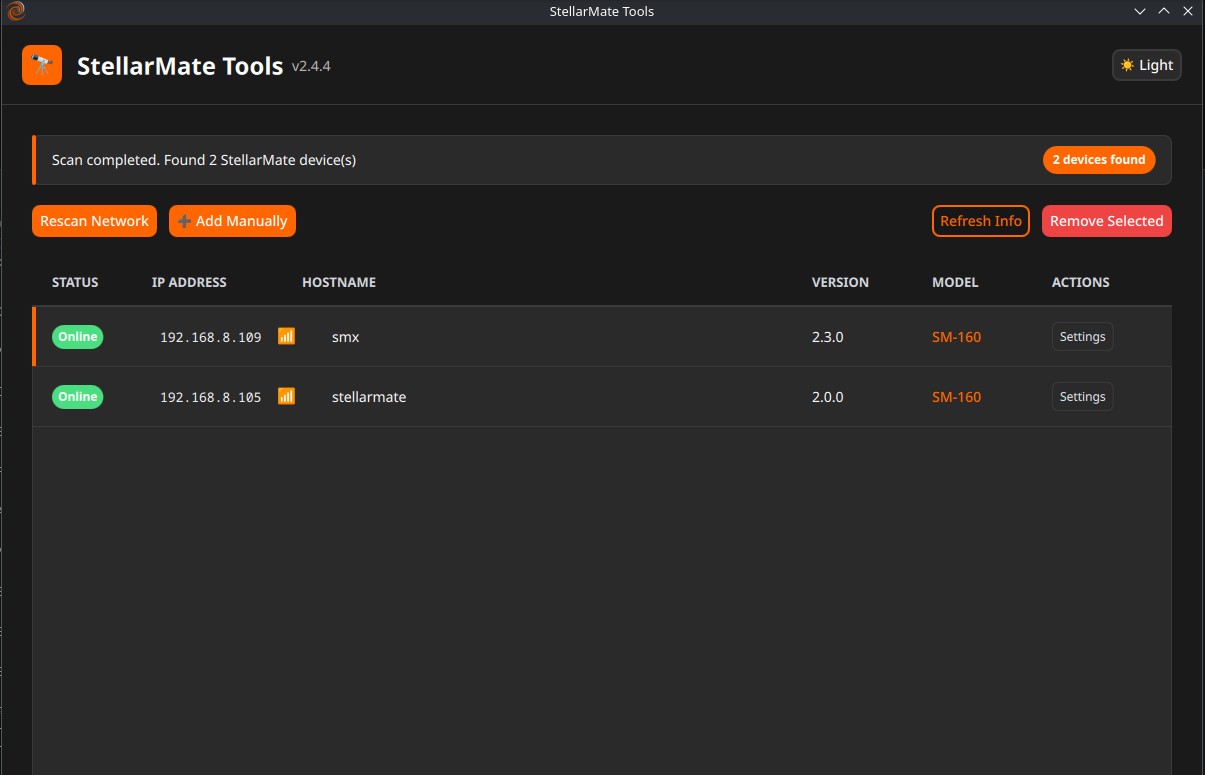
You can also use StellarMate tools. It will list all your connected SM devices on the same network.
How can I use SkySafari to control my mount with StellarMate?
If you using StellarMate Web Manager, please add SkySafari driver to your Auxiliary drivers. From within Ekos, select SkySafari from Auxiliary.
For complete instructions, please visit SkySafari INDI support page.
How can I use a Joystick to control my mount?
Please follow instrucitons in Controlling your Mount with Joystick tutorial.
How do I update StellarMate?
StellarMate OS uses Atomic Updates for system-level updates, released on a bi-monthly basis. KStars, along with INDI drivers, is distributed separately as a Flatpak and updated independently, also on a bi-monthly basis. Because Flatpaks live in your home directory, Atomic Updates never touch them. Therefore, your KStars installation, INDI drivers, images, documents, and settings are all preserved across a system update.
There are multiple ways to update StellarMate OS:
1. StellarMate App
Once connected to your StellarMate Device, you can update it directly through the app:
- Navigate to the Device tab.
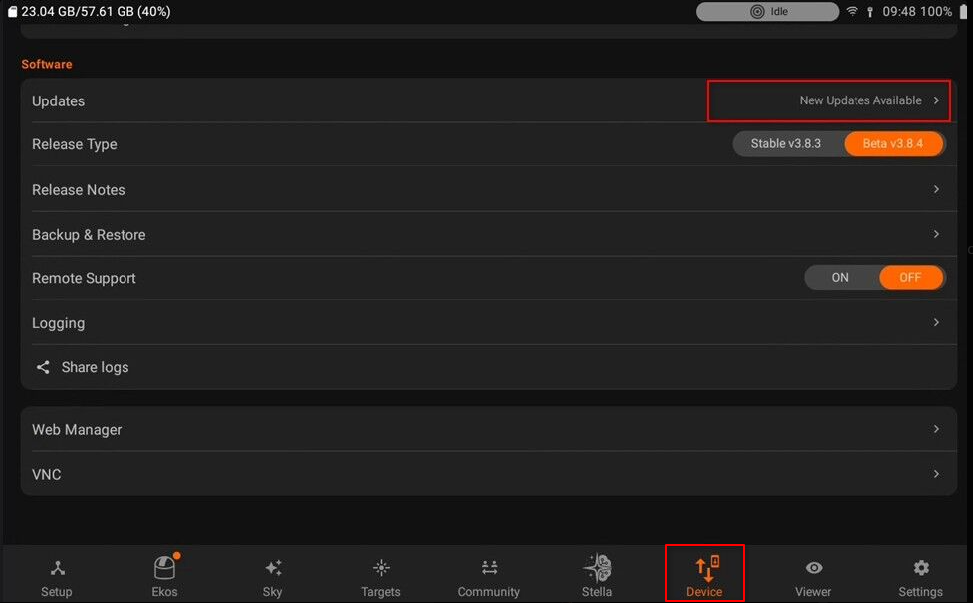
- Select Updates to update your StellarMate Device. If no delta updates are available, only the existing packages will be updated.
For further details, please refer to the StellarMate Manual.
2. StellarMate Tools
StellarMate Tools displays all StellarMate Devices connected to the same network, allowing you to manage and update your device(s) directly.
2.1 StellarMate Tools in StellarMate OS
StellarMate Tools can be accessed from the StellarMate Desktop: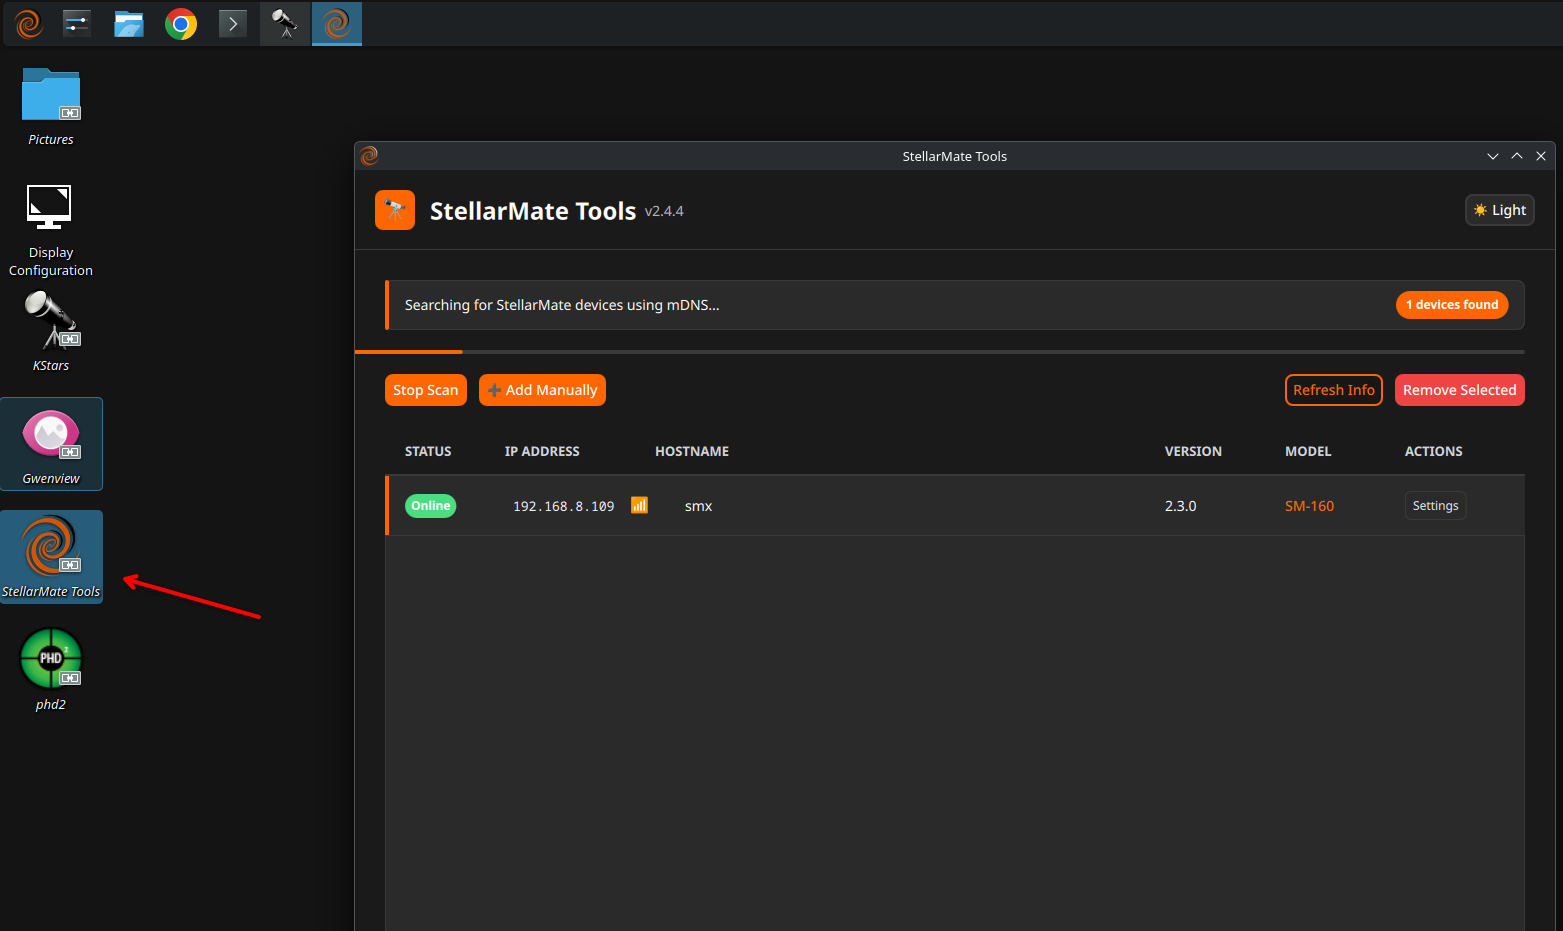
Click Settings to manage your StellarMate Device.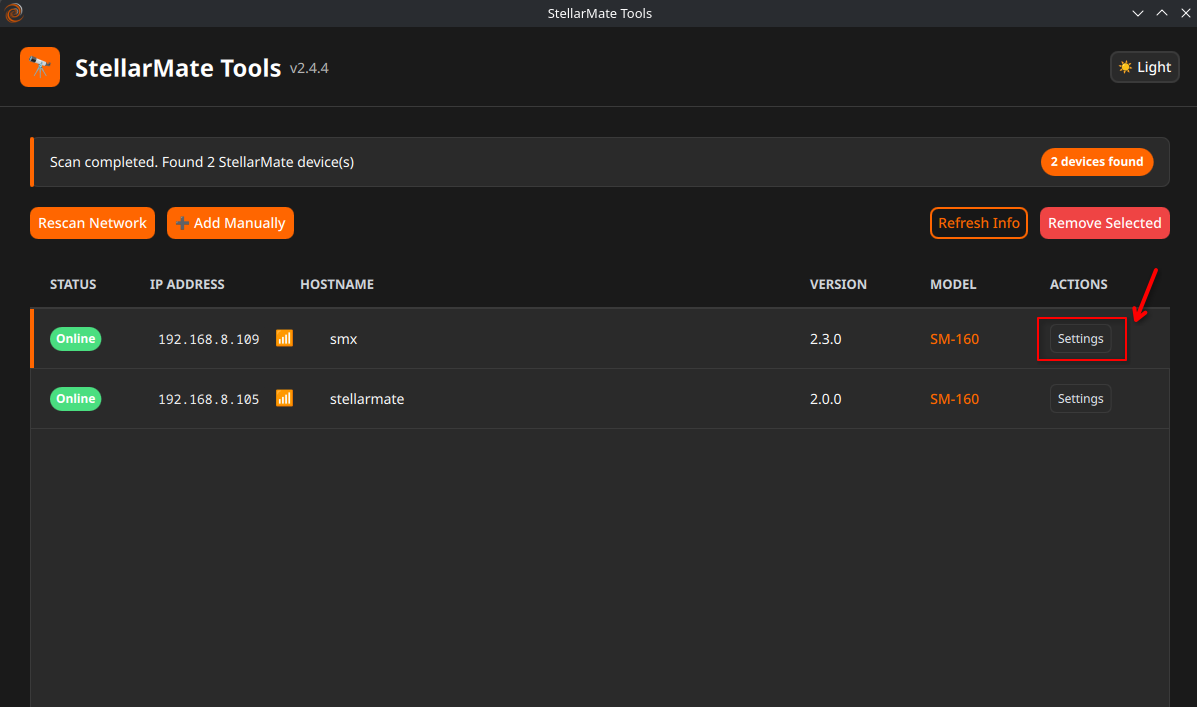
Click on Software Updater to check for updates.
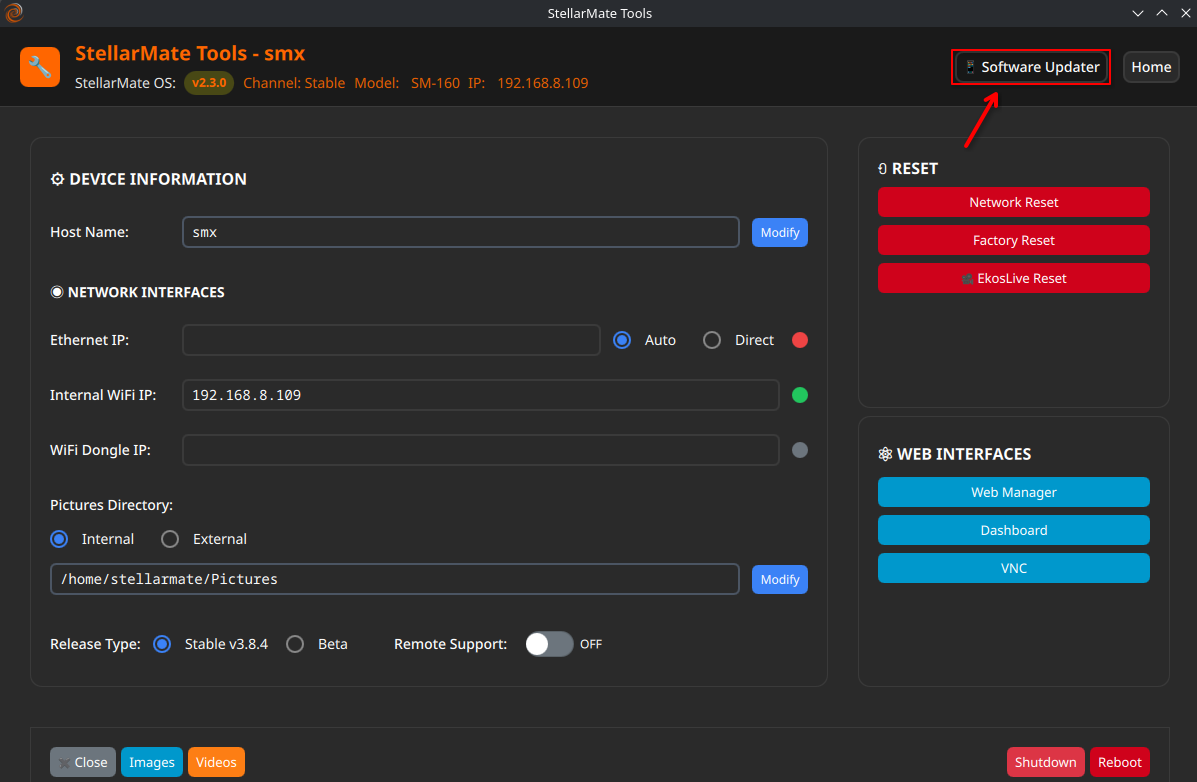
For a detailed walkthrough, please refer to the StellarMate Manual.
2.2 SM Tools in Windows/Mac
StellarMate Tools is also available for Windows and macOS. Once installed, it allows you to manage and update multiple StellarMate Devices simultaneously from your desktop.
Can I use SSH to login remotely? How about SFTP?
Yes. Stellarmate does not use the default SSH port. Use port 5624 to log in to Stellarmate using your username and password.
ssh -p 5624 [email protected]
The same port should be used for SFTP (e.g., in FileZilla).
How can I save my images on StellarMate?
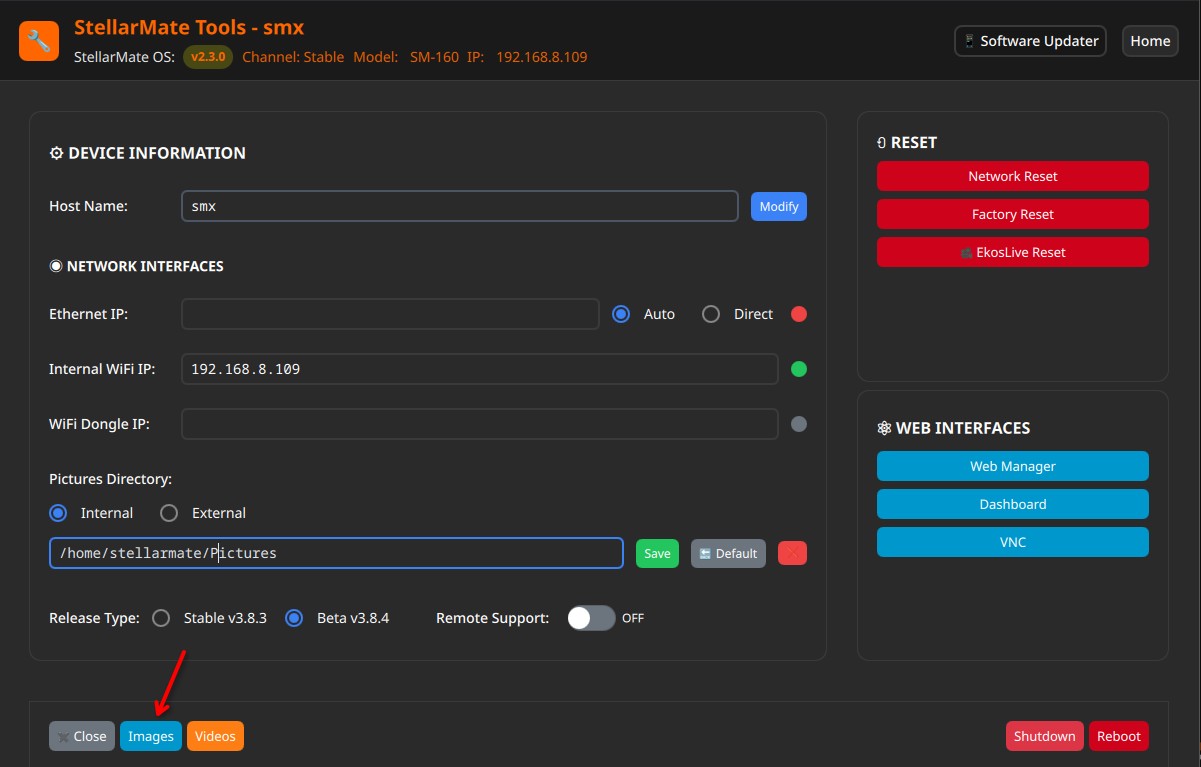
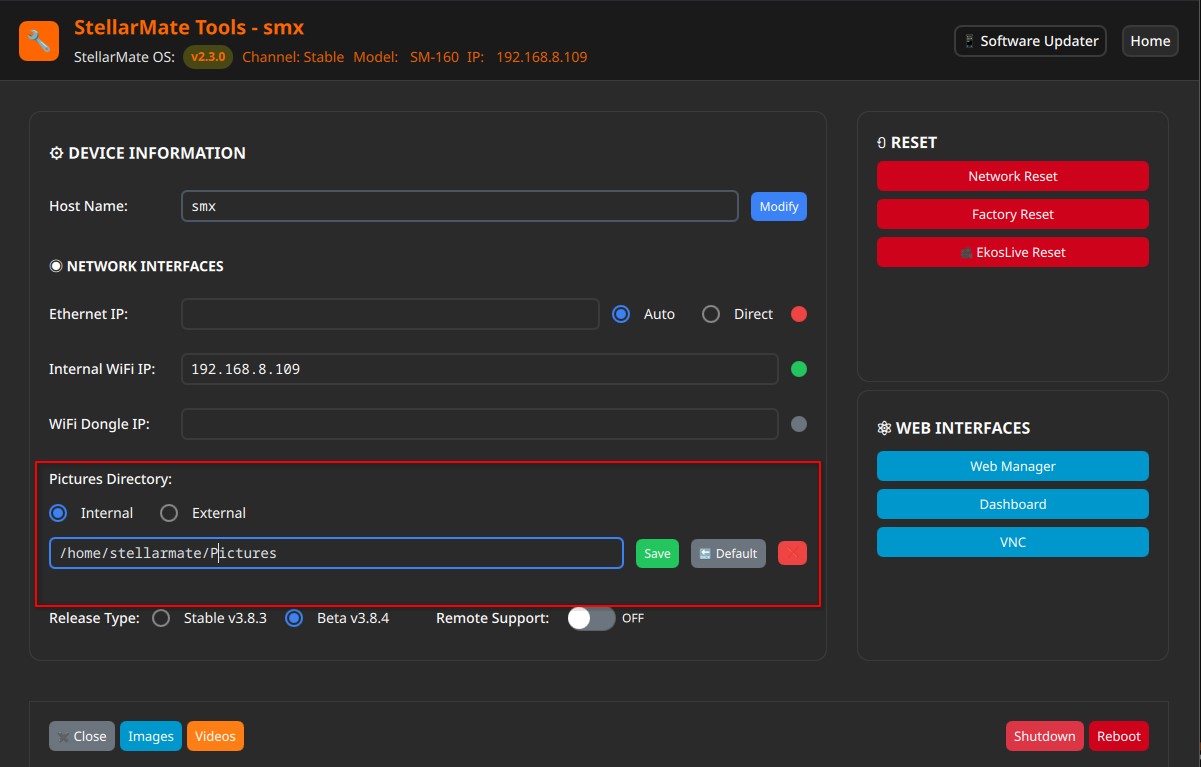
StellarMate ships with 32GB MicroSD card. Images are saved by default to the internal SD card. It is possible to change the default Pictures directory (/home/stellarmate/Pictures) to a different location using either StellarMate Tools or StellarMate App.
StellarMate Tools
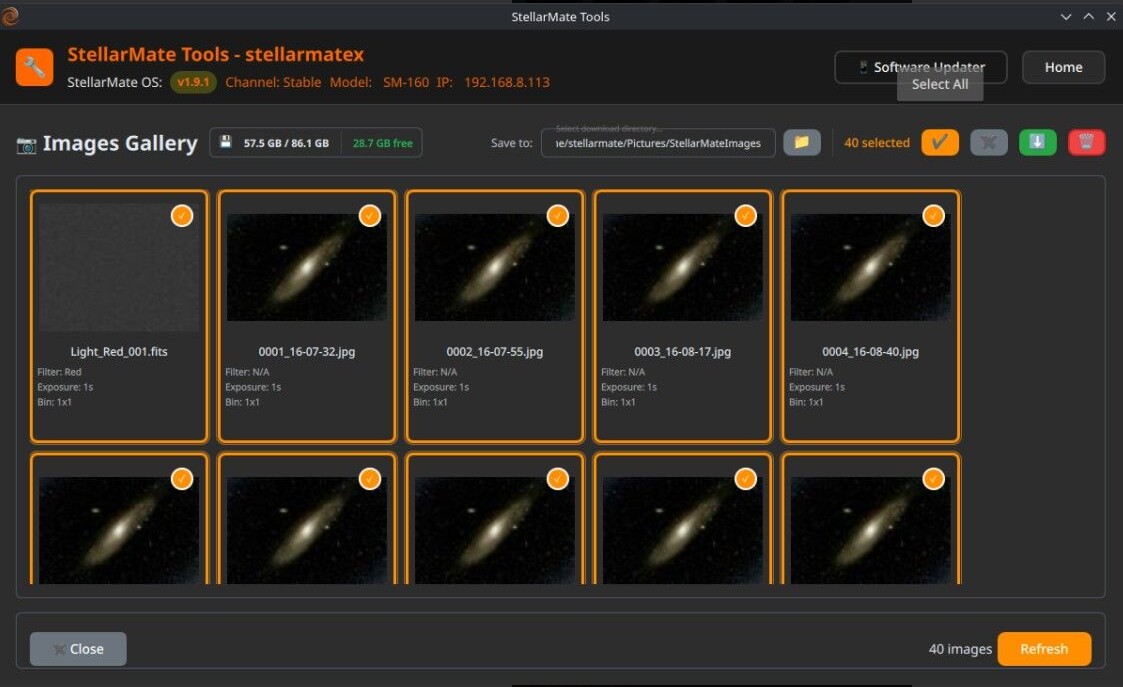
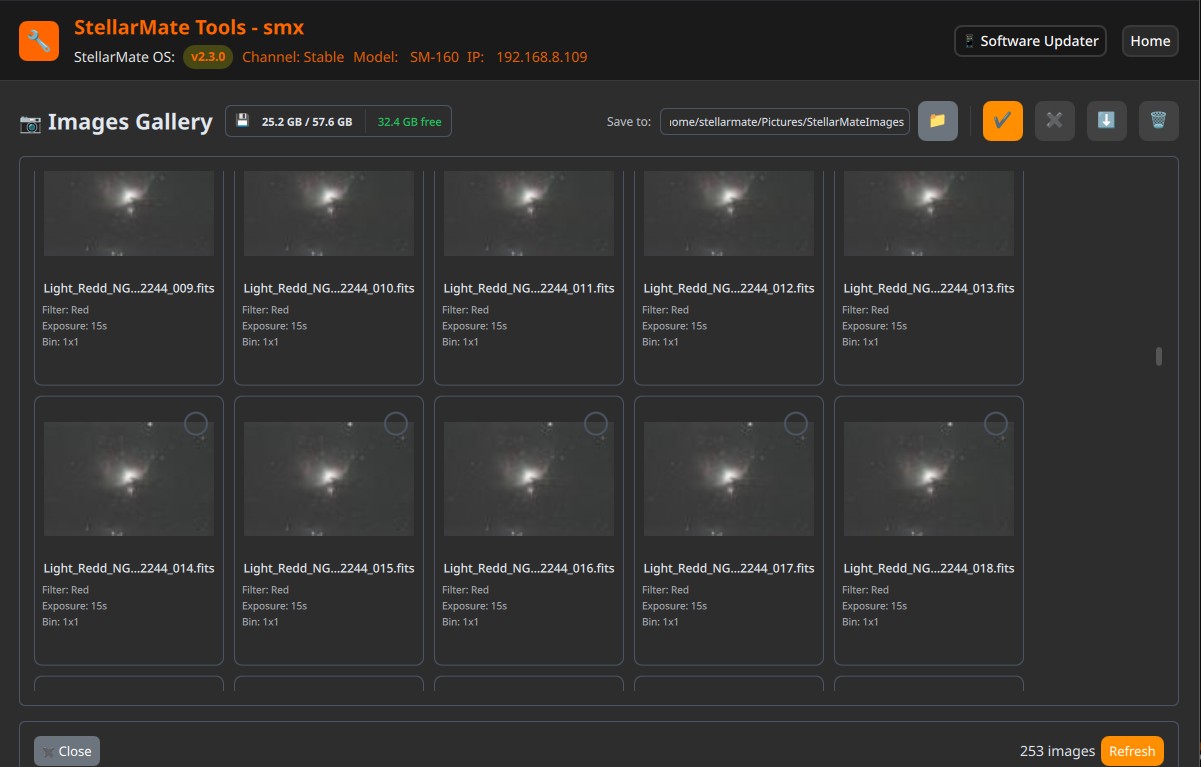
Select individual images or click Select All for batch operations. Click the download icon button to download your selected images.
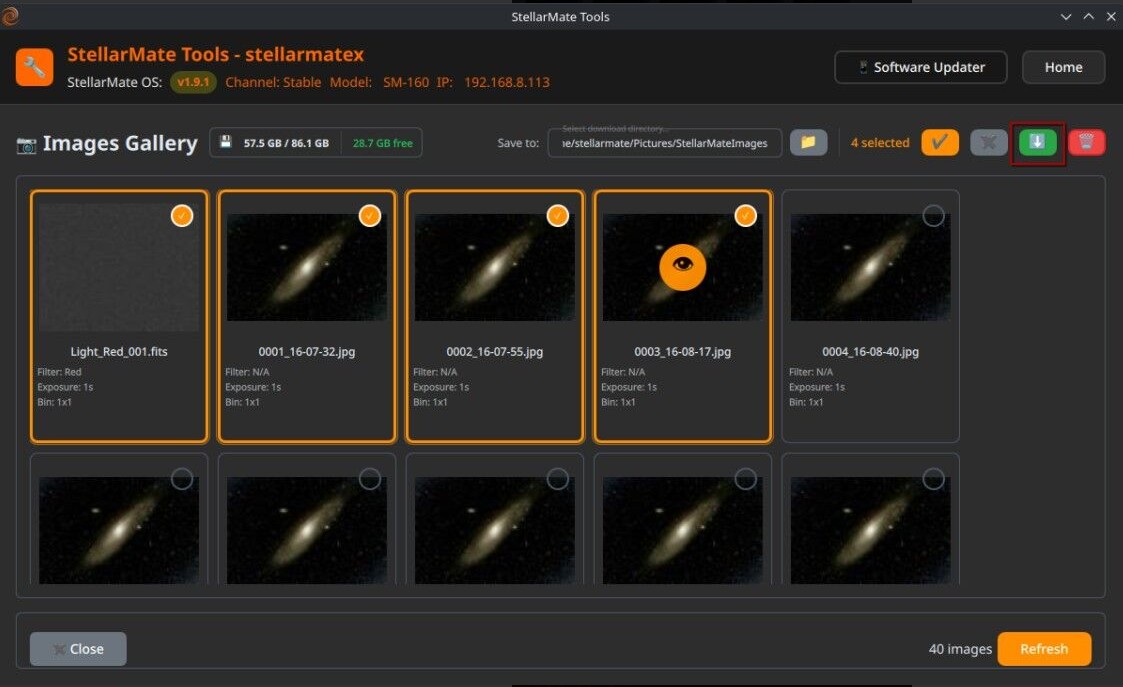
Downloaded images are saved to ~/Pictures/StellarMateImages
StellarMate App
From StellarMate App Capture Module, toggle File Settings to change the default Pictures directory or set it to an external storage.
KStars on PC/Mac
If you are using Ekos on PC/Mac, then you need to set Upload mode to Local and then set the Remote Directory to /home/stellarmate/Pictures as illustrated below:
2. If you are using Ekos directly on StellarMate, simply set the Directory field in the capture module to /home/stellarmate/Pictures. The Upload mode should remain as Client.
/home/stellarmate/Pictures is case sensitive. Make sure not to set it by mistake to /home/stellarmate/pictures
Can I use my ASCOM drivers and software with StellarMate?
How can I connect to StellarMate directly via Ethernet cable?
It is possible to connect to StellarMate directly without going via a router. Simply connect an ethernet cable from your PC/Mac to StellarMate. There is no need to use a crossover cable, any regular Ethernet cable would do. You can access StellarMate as you would normally do via the address http://stellarmate.local
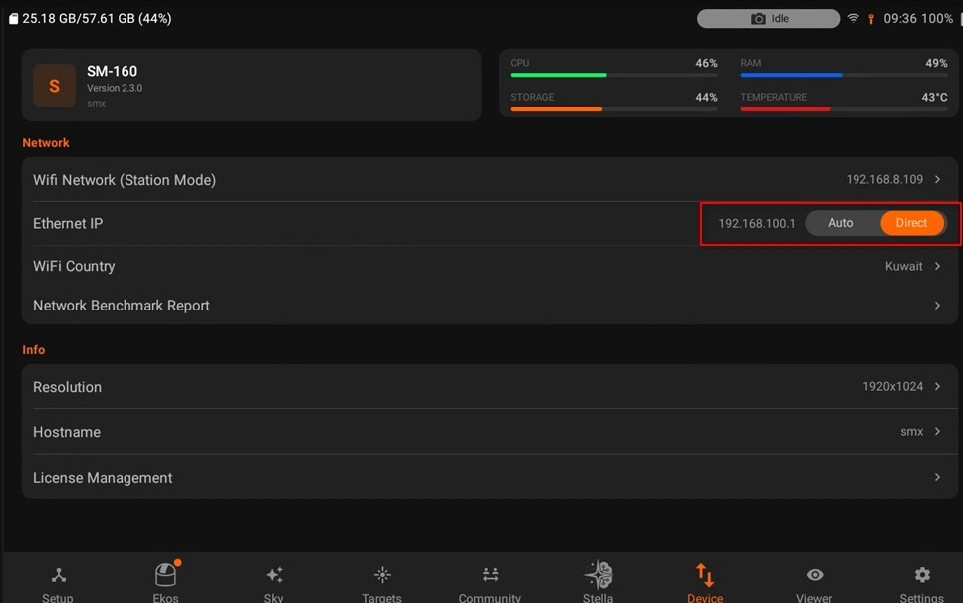
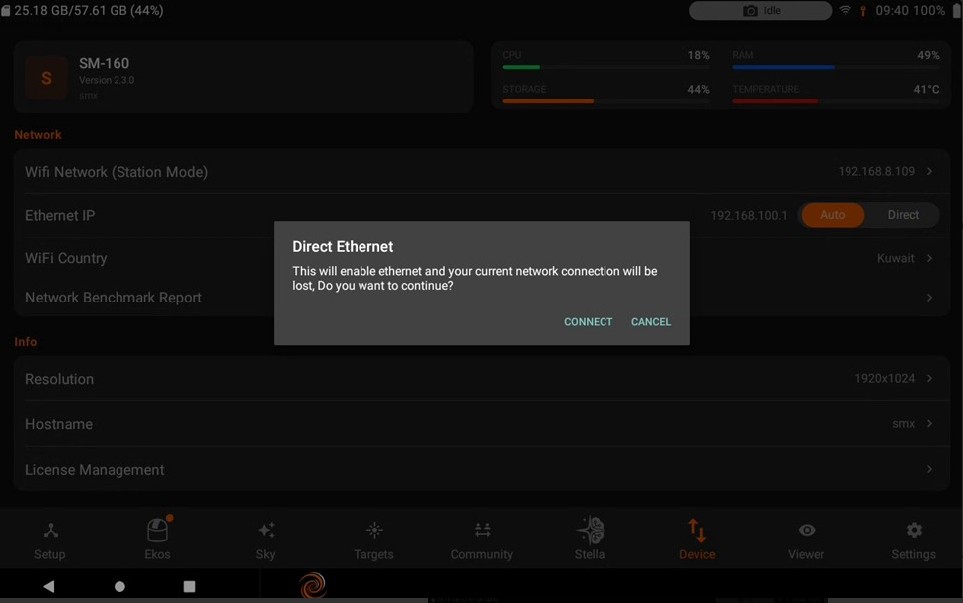
Using the App or StellarMate Dashboard, you can set StellarMate to Direct Ethernet mode. In this mode, StellarMate IP address is set to 192.168.100.1
Using your OS network configuration tool, Change your Network Adapter IP settings to the following:
- IP Address: 192.168.100.2
- Subnet Mask: 255.255.255.0
- Gateway: 192.168.100.1
- DNS: 192.168.100.1
After applying the settings, you can access StellarMate either via http://stellarmate.local or via http://192.168.100.1 address.
- You can also use the SM App --> Device tab to enable or disable Direct Ethernet.
How to access images on StellarMate from PC/Mac?
If you captured images and saved them to StellarMate, then they should be available by default under /home/stellarmate/Pictures. To access the images over the network, there are few options:
- On Windows, click on the Network icon in the left pane of File Explorer as illustrated below.
Windows 11 users may have issues accessing Samba shared over the network. Please follow this extenstive guide on how to make it work again.
If you do not see the StellarMate network share, please map the network drive as shown in this video:
- On Linux & MacOS: Use FileZilla to connect to StellarMate via Secure FTP (sftp) using your username (stellarmate) and password (smate). Remember to set port to 5624.
- On StellarMate tools, you can access captured images. Please select your desired SM Device on the network and look for images under Settings.
How to Install PoleMaster in SM OS 2.0
Can I add a Real-Time Clock?
StellarMate Gadget already ships with an RTC clock configured and ready to go. For users of StellarMate OS running on their RPI3/RPI3B+, you can purchase a DS3231 module and install it. There is no need to perform any additional software configuration, as StellarMate OS supports DS3231 natively.
Cannot connect to DSLR camera?
The following is a list of checks you need to verify before contacting support regarding DSLR connectivity issues:
- Make sure the camera battery is full.
- Make sure there is enough space on your SD card.
- Make sure the camera is set to Bulb/Manual mode. In some models you need to rotate the dial first to Manual then change the setttings to make it Bulb.
- Turn off any power-saving features in the camera that might be making the camera go to sleep mode without your knowledge. Some cameras support inactivity timer, try to set it to 10 or 15 minutes to be on the safe side.
- Try a different USB cable.
- Try plugging the camera to a different USB port on StellarMate.
If none of the above works out, please submit a support ticket with details on your setup.
Can I hook up an external USB drive for storing images and videos?
Absolutely. After you connect the external USB drive, use SM App to connect to StellarMate and start an equipment profile.
Then go to Capture module and File Settings
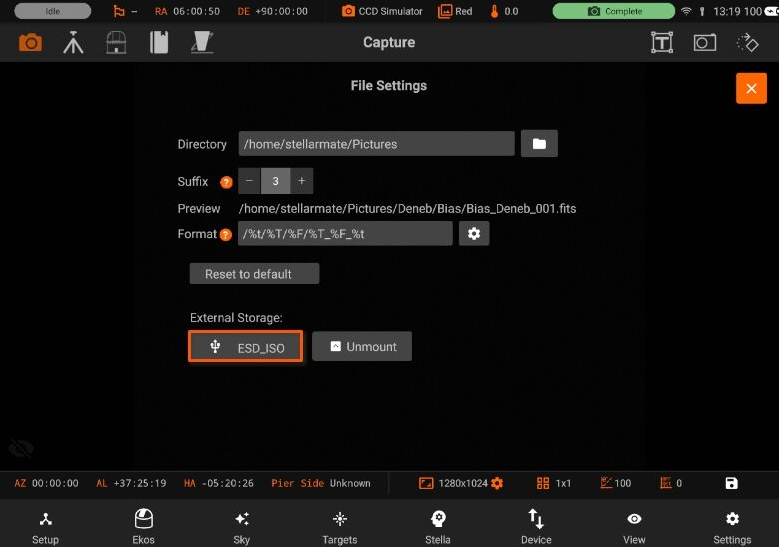
Tap the external storage name, and it will be set as the default location for the Pictures directory. Restart StellarMate for the change to take effect.
If the USB storage is not detected by StellarMate, it will fall back to the default /home/stellarmate/Pictures directory
1. Using KStars on StellarMate
If you are running KStars inside StellarMate directly, then simply browse the location in the Directory field of the Capture Module. You can also paste the URL there directly.
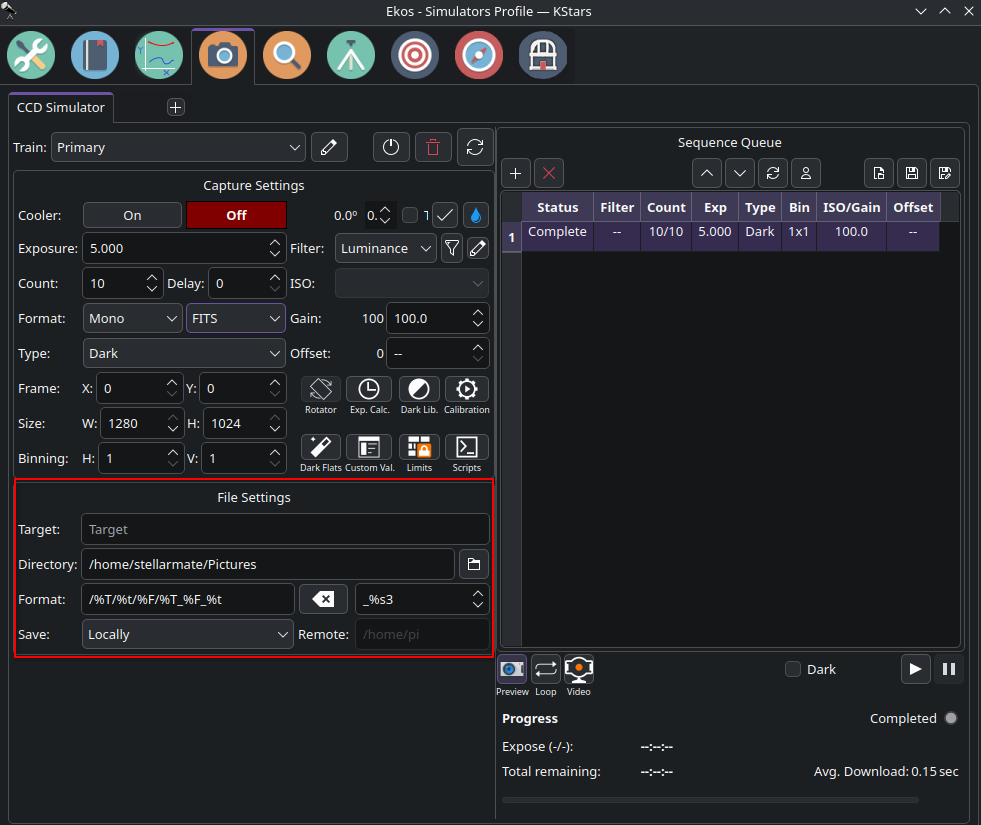
2. Using KStars on Windows/MacOS/Linux
If you are running KStars remotely on a Windows/MacOS or Linux machine, then in this case you need to change the Upload mode to either Local (save images only in StellarMate) or Both (save images in StellarMate and send a copy to us).
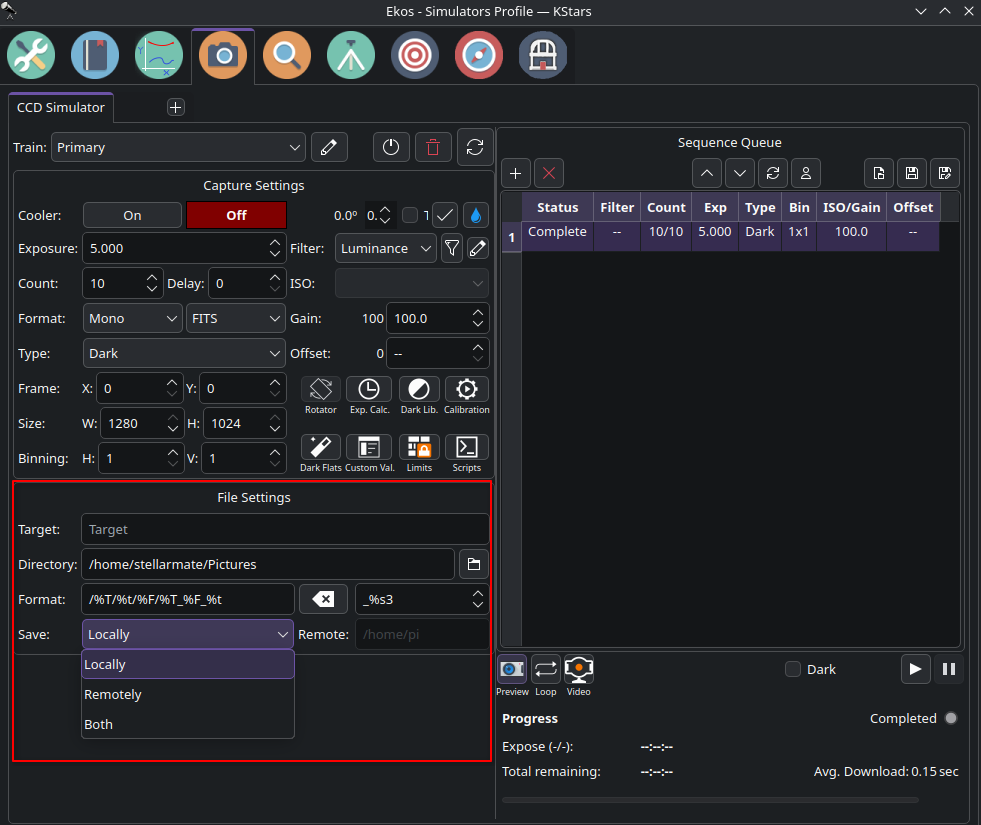
You will see the Remote field getting enabled for editing. Simple paste the location URL here and start the capture process to have your images saved to the external USB disk.
You can also change the Pictures Directory using StellarMate tools.
How to install StellarMate OS on another MicroSD?
If you have purchased StellarMate from a retailer, please submit a new ticket and attach your order receipt and tell us if you don't see an order on the Orders page.
To be able to use a different MicroSD than the already built-in one, you need to flash StellarMate OS onto your MicroSD.
1. Log in to the stellarmate.com website and then go to the Orders page.
2. You should see a list of your orders. Click on your order link, then scroll down to see the downloads. Make sure to download the SM OS version appropriate for your hardware platform.
3. Download balenaEtcher, install it, then open it.
4. Connect an SD card reader to your computer with the MicroSD card inside.
5. Open Etcher and select from your hard drive the StellarMate OS .xz file you just downloaded to write it to the MicroSD card.
6. Select the MicroSD card you wish to write your image to.
7. Review your selections and click 'Flash!' to begin writing data to the SD card.
8. When it's done, connect the MicroSD to StellarMate and power it up!
I can't find StellarMate WiFi hotspot?
StellarMate HotSpot is only active when StellarMate is not connected to any WiFi network. By default, the StellarMate Hotspot operates at 5Ghz WiFi (not 2.4Ghz). Therefore, your phone/tablet/PC must support 5Ghz WiFi. It is possible to switch StellarMate WiFi to 2.4Ghz but you need to use SM App to switch and you need a 5Ghz WiFi capable device first to connect to it.
Common Issues
1. Insufficient power: You must use a reliable power supply that can deliver 5 volts at 3 (for RPI4) and 5 (for RPI 5) Amperes. If powered via battery, make sure it can consistently deliver 3A to StellarMate.
2. Failure to boot: Check if StellarMate is booting. For Raspberry PI, the green LED should NOT be solid green all the time. If it is solid green, this indicates an SD problem and you should probably try another SD card and verify the SM OS image checksum. To know the exact failure, connect StellarMate to an external monitor with HDMI. If you see KStars on the monitor, then this indicates boot was successful and the hotspot problem is not boot-related. However, if you see a black boot screen with messages, then capture an image of the monitor with your phone and send it to support in a ticket.
3. Noisy WiFi Environment: In case you have a very active and noisy WiFi environment (many WiFi network), it can overwhelm the WiFi controller in StellarMate and it cannot generate a proper hotspot. Try to get away from very noisy WiFi environments to have a successfully HotSpot.
4. Metal Enclosures: If using StellarMate OS with your own Raspberry PI with a metal case, then it can lead to attentuation of WiFi signals. Try to use a plastic enclosure.
5. Close Promixity to other electronic devices: Some users reported HotSpot signal loss when StellarMate is stacked with other devices like monitors or USB hubs. Try to maintain at least 15 cm away from any other electronic device that can cause interferance with the HotSpot Signal.
6. USB 3.0: There is a known issue with USB 3.0 ports causing significant interfaces with 2.4Ghz signals. If an active USB 3.0 port is used by any peripheral, it may lead to signal degradation. There are two methods to resolve this issue:
6.1 Connect USB 3.0 peripherals to the StellarMate USB 2.0 port
6.2 Switch StellarMate OS WiFi HotSpot Frequency to 5Ghz range which is immune to this interference from USB 3.0.
7. HDMI Resolution: If you connect StellarMate to an external display using an HDMI cable, then high resolution is known to cause interference with WiFi. Try to lower the HDMI resolution to improve the situation.
If you have trouble connecting StellarMate to your router via WiFi, please access your router and clear all cache and any entries for StellarMate.
Why can't my GPS dongle get a fix?
There are a few reasons for failing to get a 3D FIX from your GPS dongles.
- Indoor obstructions. Test with GPS outside with clear access to the sky so that it can communicate with the satellites.
- USB3 Interferance: If the GPS antenna is is connected close to an active USB3 port (a USB3 port connected to a device like a camera), then the interferance may lead to failure in obtaining a fix. It's recommended to get a GPS dongle with a long wire away from StelarMate to protect against unwanted interferance.
- Incorrect baud rate: Some older GPS dongle uses a baud rate of 4800. The default baud rate in StellarMate is configured as 9600. Therefore, StellarMate would fail to communicate with the GPS dongle unless the rate is changed within StellarMate to match the GPS dongle rate.
Is Raspberry PI 5 supported?
Yes, Raspberry PI 5 is fully supported.
How to access Ekos Guide Logs?
Ekos Guide Logs are in PHD2-compatible format and are located in "~/.local/share/kstars/guideLogs".
You can use PHD2LogViewer to view the analysis.
Connection to serial devices fail with a message that another driver is using the port?
This may happen when more than one INDI driver is trying to open the same serial port, leading to a deadlock. When a new equipment profile is first started and there is more than one serial port detected on the system, the Port Selector window should pop up (on both Ekos and StellarMate App). In this step, you need to select the appropriate serial port for each device. Once done, press Connect All. Skipping this step would cause all drivers to try establishing communication by iterating over all detected serial ports, and this may lead to a deadlock as indicated before.
There are two approaches to resolve this issue:
- In Ekos, edit your Equipment Profile, make sure Port Selector is checked, and save the profile.
- In the StellarMate App, delete and re-create the equipment profile.
Next time you start the profile, the Port Selector should come up again.
Install StellarMate OS on Proxmox fails
To install StellarMate OS on any VM, you should activate EFI booting.
For Proxmox, you also need to disable the Pre-enroll Keys for the EFI Disk
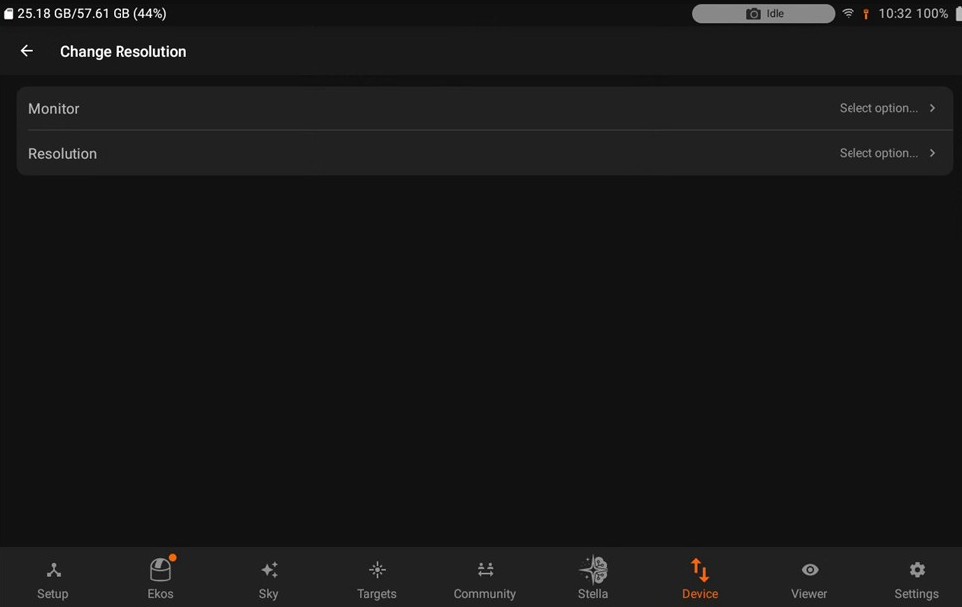
How to change the monitor resolution?
You can change the Screen configuration by following the steps below:
- Click on the Start Menu
- Select Preferences --> Screen configuration
You can also check the Video below:
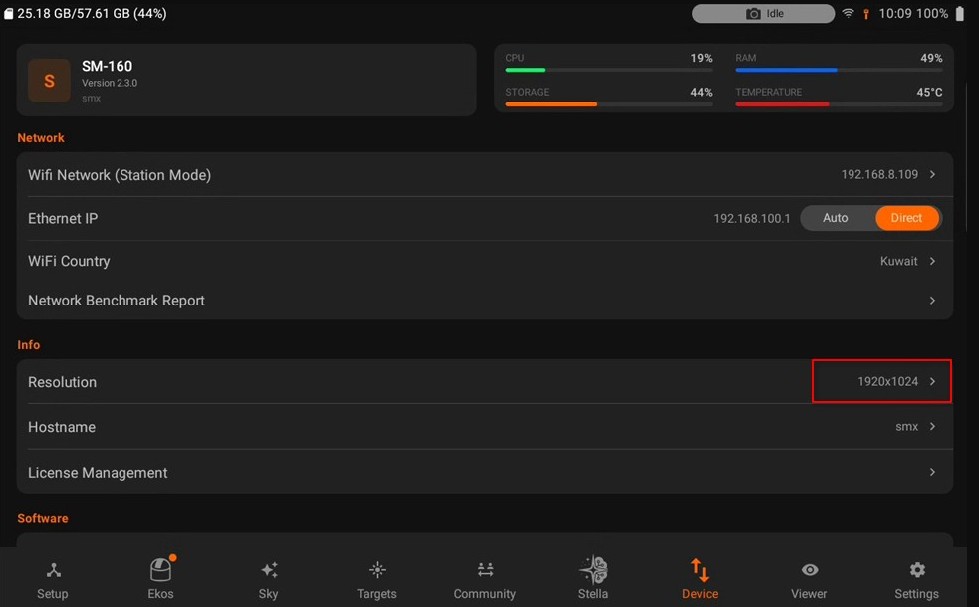
You can also change the resolution using the SM App.
- Navigate to the Device tab.
- Select the available monitor display and change its resolution.
Can I use SD Card for Raspberry PI 4 for Raspberry PI 5?
Yes, the same SD card can be used and swapped at any time between Raspberry PI 4 & 5.
Is Wayland supported?
Wayland display protocol is currently not supported in StellarMate OS due to issue with VNC support. Please ignore any requests to switch to Wayland in Raspberry PI OS and stick with X11 until StellarMate OS officially supports Wayland out of the box.
How to enable external software installation in StellarMate OS 2.0?
StellarMate OS 2.0+ uses atomic updates to ensure your system is fully updated correctly in one operation and that all system components work together reliably. This approach provides a more stable experience, especially for remote observatory deployments.
For advanced users that required direct access to the underlying Arch-based Pacman repository for custom software installation, you can disable atomic updates by running:sudo /etc/stellarmate/atomic-updates.sh --disable
Disabling atomic updates will enable third-party software repositories, which could potentially lead to system instability. Only proceed if you understand the risks and are comfortable troubleshooting potential issues.
How to install TSX on SM OS 2.0?
How to get any TSX version beyond 13823 running on my StellarMate OS 2.0+.
The error was missing linked libraries:
libicui18n.so.72 => not found
libicuuc.so.72 => not found
You need to install libicu72-bin using the command below (as a regular StellarMate user)yay -Sy libicu72-bin
The required files are shown in the image below
You should now be able to update to TSX 13954 and TSX 14036 (the most current Linux ARM64 version as of 10 March 2026)
How to install ASTAP on SM OS 2.0?
1) Download astap and d50_star_database files.
2) sudo pacman -U astap_aarch64.pkg.tar.zst
3) sudo pacman -U d50_star_database.pkg.tar.zst
4) Download astap_cli
5) renamed astap-cli to astap
6) sudo cp astap /opt/astap/
SM OS 2.0 not booting on my RPI?
Bootloader update required
If the unit is not booting or you cannot access it via VNC, your Raspberry Pi bootloader is likely out of date. Update it first using Raspberry Pi Imager. Follow the official HOWTO.
How to install Fire Capture?
- git clone https://aur.archlinux.org/firecapture.git
- cd firecapture
- ### cat PKGBUILD
- makepkg -si
How to install MW4 on SM OS 2.0?
For mw4 there are installation instructions at MWorion
In summary:
1) in stellarmate directory using terminal type: curl -LsSf https://astral.sh/uv/install.sh | sh
2) mkdir mw4
3) cd mw4
4) uv venv -p 3.13
5) Check to make sure you have `.venv` dir: ls -la
6) uv pip install mountwizzard4
7) uv pip install https://github.com/mworion/mountwizzard4/raw/main/wheels/PyQt5-5.15.9-cp38.cp39.cp310-abi3-manylinux_2_17_aarch64.whl
8) To run the program, go to the mw4 directory and run: `uv run mw4`
StellarMate App FAQ
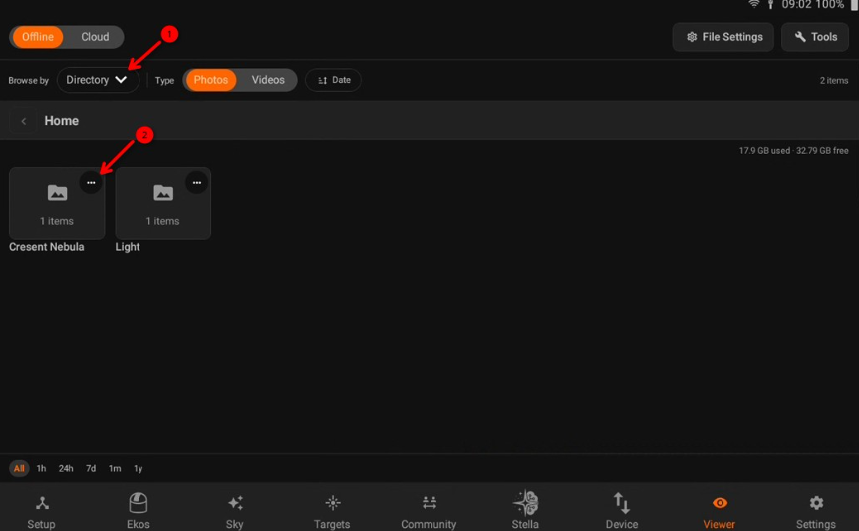
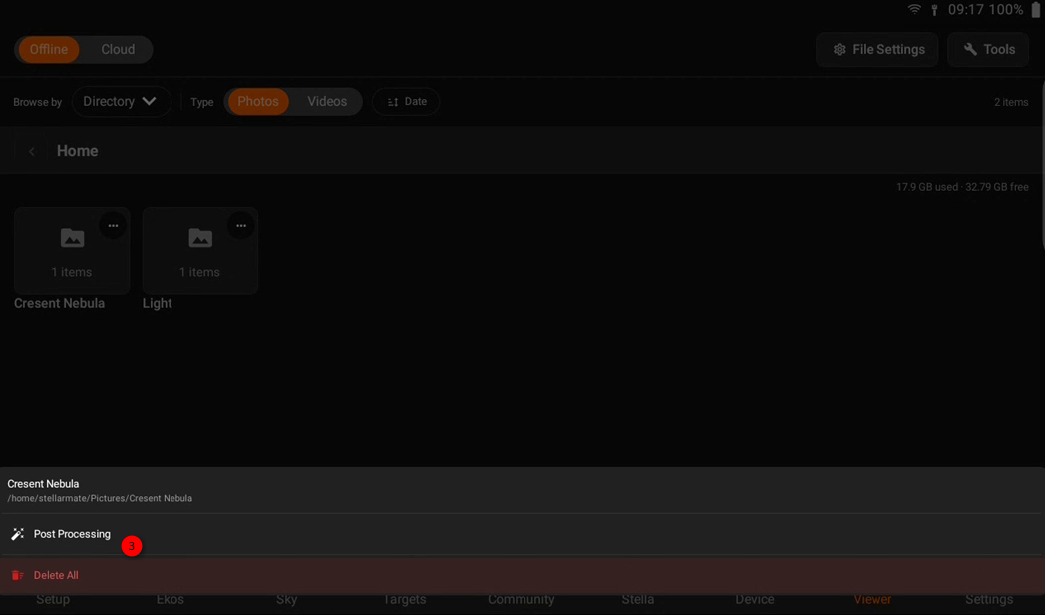
How to perform Post-processing in StellarMate App?
Do I have to use StellarMate App or can I control StellarMate using other methods?
StellarMate is probably the most versatile astrophotography controller in the world. We offer multiple ways to control your equipment the way you prefer.
StellarMate App is only required for the initial setup of your device. Therefore, after you SCAN and connect to your StellarMate unit, and the connection LED turns green, your unit setup is complete.
You can then continue to use the StellarMate App to control your unit, or select one (or more) of the following methods:
1. Download KStars on Windows/Mac/Linux and connect remotely to StellarMate.
2. Access StellarMate OS via VNC (using either Web VNC or VNC clients like RealVNC) or Rustdesk, and use KStars that is already running inside StellarMate.
3. Control it completely from the EkosLive Online web interface.
The App fails to detect StellarMate after clicking RESCAN?
Please check the following suggestions:
- Ensure that you can see stellarmate HotSpot network name in the list of networks detected by your tablet. If the stellarmate network is not listed, then check that StellarMate is properly powered. Use the HDMI cable to connect the unit to a nearby monitor/TV and check for any error messages. Take a photo of the error and open a support ticket in order for our technical support to help you further.
- Ensure Tablet is connected to the HotSpot (default password is stellar@mate) or connected to your Home WiFi if StellarMate Controller was joined to the Home WiFi network before. If the tablet is connected to your Home WiFi, do you know its IP address? You can add a device manually by its IP address.
- Open http://stellarmate.local or http://10.250.250.1 from your Tablet/Phone browser and see if you can reach StellarMate Dashbaord. If it fails to reach, then the communication is not established between your Tablet/Phone and StellarMate Controller.
- Open StellarMate Web Manager at http://stellarmate.local:8624 or http://10.250.250.1:8624. StellarMate Web Manager is required to connect to StellarMate App. If the Web Manager is not responding then this could indicate an issue in either the connection or StellarMate OS itself (corrupted image or disk). Connect HDMI cable and look for any messages on the screen and send them to support.
Mobile data can sometimes prevent communication to Hotspots. Disable Mobile Data and check if StellarMate is detected correctly.
If none of the above suggestions work, you can always reflash StellarMate Controller with a fresh SM OS image. Please note that flashing an image erases all the existing content on the StellarMate Controller storage.
How to submit logs?
App requires password but I sign up with my social login
If you signed up with Google/Apple social login, the system generates a random password in the site. For website login this is sufficient. However, StellarMate App requires username and password login since it can operate in totally offline mode. Therefore, after signing in to stellarmate.com, go to your Profile and set your own password. Use this password for logging in StellarMate App.
Where can I find the StellarMate App Licence & Serial Number?
The Serial Number and Licence Key for the Stellarmate App are listed in the Licence Management page.
- If you purchased StellarMate Controller, then the Serial Number can be found on the bottom of the unit. You need to enter the Serial Number in the Licence Management page to generate a license key.
- If you purchased StellarMate OS, then the Serial Number and Licence are automatically generated for you. So just go to the Licence Management page to view them.
If you purchased StellarMate OS or StellarMate Controller before June 1st, 2019, then in order to use the StellarMate App you must download StellarMate OS v1.4.0+ and burn it to the StellarMate SD card.
What to do when you get Session Expired, try to login message?
Every time you connect to StellarMate, it sends a token that the App uses to login to the device. Sometimes, the App uses an old token whereas a new one was generated by the system. The solution is simple, just tap stellarmate again to force a re-login.
My longitude is wrong, how do I fix it?
It's not wrong. INDI uses a different convention to represent longitude. Longitude is 0 to +360 increasing eastwards. For example, if you longitude is 80 West, then in INDI it is represented as (360-80) = +280
Why scheduler indicates are jobs are completed when I start it?
By default, the scheduler is designed to run on multiple nights. Therefore, when started, it tries to continue from where it was left on. If all the sequence images are already captured and stored on disk, then it will declare that all jobs are complete. If you would like to start anew, there are a couple of options:
- Move, rename, or delete the captured images folder.
- Edit the sequence file and change the storage location to a different location.
- Disable Remember Job Progress setting in Scheduler Advanced settings.
Why do I get "EkosLive is Down" message when connecting to StellarMate?
Usually this message is displayed when there is a communication or login error between your phone/tablet and StellarMate. A popup notification would show the exact error. Try to check the following steps:
I. Login Issues
- If the reported error is about authentication:
- Go to Settings tab --> Reset App.
- Restart App
- Sign in
- RESCAN for StellarMate
- Connect Again
- If #1 does not solve the authentication issue then login to StellarMate Via VNC and launch StellarMate Tools app on the desktop then click Reset EkosLive. Reboot stellarmate.
II. Communication Issues
- If you have Mobile Data enabled on your phone, then disable it as this might interfer with your connection to StellarMate Hotspot.
- Double check you are fully connected to the hotspot, sometimes Android/iOS do not fully connect, check network settings for any warnings. If possible, click Keep This Connection.
- Check if you can reach StellarMate WiFi using your tablet browser. Open the browser and then go to http://10.250.25.1 You should see StellarMate Dashboard if all connection is OK.
- If no response at all after reboot (i.e. not hotspot created), try to connect HDMI cable to the mini-HDMI port closest to the USB-C power port and connect it to an external monitor. Do you see any messages? Please send a screenshot to support.
- If all above fails, you can try re-flashing StellarMate OS image unto the SD card (or a new SD card).
If the StellarMate App seems to be stuck on the authentication step, sometimes simply tapping stellarmate again should resolve the issue.
How can I save the LiveStacking image?
Live Stacking image can be saved to the Tablet/Phone storage or photo gallery by clicking on the save button in the LiveStacking options as illustrated below:
Please note that the Live Stacking images are already saved to StellarMate internal storage and can be accessed via the View tab or via browsing SM shared network drive. All Livestacked images are automatically tagged with #livestacking tag so you can easily search for via the tag.
Do I need to have a view of Polaris to use Polar Alignment Assistant?
While a view to the celestial pole is desirable, it's not strictly necessary. The App would work almost anywhere in the sky, prefereably closer to the meridian.
Can I use the App & Ekos on PC/Mac to control my equipment at the same time?
Yes. It is possible to do this by following these steps:
In StellarMate App
- Start your equipment profile.
- That's all
In Ekos on PC/Mac
- Make sure you are connected to the same network as StellarMate.
- Create a new equipment profile with the same drivers started in the App equipment profile.
- Set the profile to remote and the host to stellarmate.local
- Make sure INDI Web Manager is UNCHECKED. This is very important.
- Save and then click start.
- Done!
No License Found for this device!
Starting with StellarMate App v3.0, StellarMate switched to a different management server for license data. If stale license data is encountered, you might receive this error.
The data can only be refreshed after signing in again to the App. Therefore, there are two approaches:
1. Go to Settings --> Logout and close the App and sign in again to refresh the data.
2. Completely uninstall and reinstall the App to ensure there is no residual cache left that might affect this issue.
StellartMate Pro FAQ
How to turn on power to devices when Ekos profile is started?
By default, SM Pro remembers any changes made to the power outputs so that next time the unit is turned on, it would automatically restore the power outputs to their previous state. This behavior is suitable for mobile setups since you would start using the equipment soon after powering on SM Pro.
However, for permenant observatories where SM Pro can be powered all the time, it may be desirable to only power connected devices like Mount, Camera,..etc before starting an equipment profile. To turn on power automatically to your equipment before the equipment profile is started, add a rule to the Profile Scripts Editor found in the Equipment Profile dialog in Ekos. Click on Scripts button and then add a rule, select @localhost:12624 (which is the dedicated INDI SM Pro driver running on port 12624) and then select the appropiate delay in seconds after establishing the connection (example: 5 seconds).
Please note that this feature only work when Power Off is toggled in the SM Pro driver Power tab. When enabled, Power Off turns off power whenever the driver is disconnected, which typically happens when the Ekos profile is stopped. If you manually power off your devices, then your devices can only be turned on manually.
If you are using KStars from a remote PC/Mac then the remote driver should include StellarMate Pro hostname or IP address: @stellarmate.local:12624 or @ip_address:12624
Why can't I get a GPS lock?
The StellarMate Pro utilizes a passive GPS antenna for accurate time and location data. To achieve optimal performance, adhering to the following guidelines is recommended:
Environmental Requirements
- Unobstructed View of the Sky: The GPS antenna requires a clear line of sight to satellites for reliable signal reception. Avoid placing the StellarMate Pro near structures, trees, or other obstructions.
Mitigating Electromagnetic Interference
- USB 3.0 Devices: Certain USB 3.0 devices can generate electromagnetic noise that may disrupt GPS signal acquisition. It is recommended to:
- Utilize high-quality, double-shielded USB 3.0 cables when necessary.
- Disconnect all USB 3.0 devices during initial GPS lock procedures.
Standalone GPS Lock Procedure
- Power Off: Ensure the StellarMate Pro is powered off.
- Disconnect USB 3.0 Devices: Disconnect all USB 3.0 devices from the StellarMate Pro.
- Open Sky Placement: Position the StellarMate Pro outdoors in an open area with a clear view of the sky.
- Power On and Wait: Power on the StellarMate Pro and allow approximately 60-90 seconds for GPS signal acquisition. A solid illumination of the USR LED indicates successful lock.
- Reconnect USB 3.0 Devices: Once the USR LED remains solid, you may reconnect any previously disconnected USB 3.0 devices.
By performing an initial GPS lock upon startup, the StellarMate Pro establishes a time and location reference point. This allows for continued operation even if the StellarMate App is not actively running.
This procedure is intended for situations where the StellarMate App is not being used for device synchronization. When utilizing the StellarMate App, GPS data is typically acquired from the connected phone or tablet.
Using Active Antenna
By default, SM Pro is shipped with a passive GPS antenna. Due to interference issues from USB 3.0 devices and other sources, the satellite signal may not be sufficient to obtain a GPS lock. StellarMate Pro Active GPS Antenna can be used to overcome this limitation.
SM PRO hardware board revision PRO-3 or later (Release October 2024) provides support for external active GPS antennas. The GPS antenna will not work on older PRO-1 and PRO-2 revision boards. You can find your board hardware revision in the device tab.
Place the antenna at least 50 cm away from the SM Pro. In the StellarMate App, tap the GPS status indicator to toggle between the Passive & GPS antennas.
How to turn off power to devices when Ekos profile is stopped?
By default, StellarMate Pro does not turn off power to devices after an equipment profile is stopped. Once you toggle on/off a 12V DC output, SM Pro remembers this across sessions. However, it is sometimes desirable to turn off power to connected devices as soon as an Ekos equipment profile is stopped. This might be useful in permentant observatories where StellarMate Pro is always powered. To enable this option, turn on the Power Off option in StellarMate App Power tab.
Why StellarMate Pro adapter uses 2.5x5.5mm XT-60 adapter?
StellarMate Pro uses a high-density XT-60 connector. Included with each unit is an XT-60 to a female DC Jack (5.5x2.5mm) adapter that can support up to 10A.
Please note that using a 5.5x2.1mm adapter might limit the current to only 5A and can cause a voltage drop on the input power side. This might result in unstable output voltage which can distrubt the connect devices.
It is recommended to use the StellarMate Pro Official 10A power supply.
How to connect to StellarMate Pro driver?
StellarMate Pro operates on its own dedicated port 12624. If you use StellarMate App to create equipment profiles, then the driver is automatically appended to your equipment profile. Similary, if you try to start an equpiment profile remotely from a PC/Mac, then the Web Manager automatically adds the SM Pro driver to your equipment profile. However, if you create an equipment profile directly in StellarMate Pro (for example, via VNC), then you need to explicitly add the driver in the Remote Driver section:
@localhost:12624
Can I raise input voltage to more than 12.5 volts?
Yes, you can adjust the maximum voltage in the INDI Control Panel (in the app, go to Ekos --> INDI Control Panel --> SM Pro --> Power). By default, it's set to 12.5v so if the input voltage is detected above this, it will not allow you to turn on the 12v output. As indicated in the manual, the outputs are indeed unregulated. Therefore, if you adjust this value, then adjust it at your own risk. Overvoltage can damage some devices.
1. From StellarMate App
2. From INDI Control Panel
How to flash a new image to SM Pro?
SM Pro internal storage can be flashed with a new SM OS image is desired. This requires opening the case and flashing the image to the mSATA storage inside as per the following steps:
1. You need an mSATA reader/writer (Similar to this product on Amazon)
2. Unscrew the case and carefully. There are 4 screws securing the case. Once done, carefully lift the lid as there are pigtails connecting the GPS + WiFI antennas to the board and we don't want to accidentally snap them.
3. You should see the mSATA SSD on the left side with two small screws. You can simply unscrew them and take out the SSD.
4. Attach the mSATA SSD into the reader/writer purchased in step #1
5. Download SM Pro OS
Use Raspberry PI Imager to flash the downloaded image to the mSATA, then secure the mSATA again into SM Pro and close the case.
Do not customize any settings. Select your device (the mSATA) then select Custom Image:
The SM OS should then work on next power up. In case you have issues with any equipment, please connect SM Pro to the internet and enable Rustdesk and send us the ID. This remote support would help us to login and diagnose any issues.
StellarMate X FAQ
StellarMate X is stuck on the loading screen
StellarMate X creates its own virtual display screen so it is accessible via VNC without any monitors connected. If you connect an external HDMI monitor to StellarMate X, it attempts to clone the internal display to the external display. Sometimes this results in the external display stuck on StellarMate X loading screen. The system is fully usable nonetheless. There are two methods to resolve this:
- Unplug and replug the HDMI cable.
- Restart StellarMate X, since the issue happens intermittently.
I already have StellarMate OS license for RPI4, do I have access to StellarMate X OS for Inte/AMD Mini PCs?
No, StellarMate X OS requires a separate license.
Connecting to an External HDMI Monitor
On startup, StellarMate X wil attempt to duplicate the internal virtual display to an external HDMI monitor. You can configure the Display Configuration from StellarMate App or VNC. In VNC, follow the steps highlighted in the picture below to duplicate the VIRTUAL1 output to your external HDMI monitor.
VESA Mount for StellarMate X?
Need a VESA mount for your StellarMate X or Mele MiniPC running StellarMate X OS? While StellarMate X comes with a VESA mount included, you can now create your own thanks to Steffen Gardner, who designed a 3D-printable version. Download the design and print your mount today!
Ekos Live FAQ
How do I access EkosLive?
You can access EkosLive from this address https://live.stellarmate.com
Can I access EkosLive Web App from multiple browsers/phones?
No. Currently, only one connection is permitted to EkosLive. If you try to login from another login, you will be logged out from your current location.
Is EkosLive Secure?
Absolutely! EkosLive transmits all traffic over SSL and WSL (for Secure Websockets) using industry-proven encryption at both ends. Your data is securely stored where you are the only party that can download and view them. No data is shared with any 3rd party.
Is EkosLive free?
Yes! We offer two tiers of EkosLive subscriptions:
1. EkosLive Basic: Free
2. EkosLive Pro: $4.99/Month subscription.
The EkosLive Pro version differes from Basic in that you get unlimited bandwidth to upload and view images in addition to cloud storage & video streaming capabilities. But the basic version of EkosLive is already quite powerful and can perform Capture, Alignment, Focusing, and Guiding!
Is EkosLive a replacement for Ekos?
No. EkosLive is a complementary tool to Ekos. It actually requires Ekos in the background. The benefit for EkosLive is that you can access it at any time you have internet access. There is no need to use TeamViewer or 3rd party solutions to login remotely to your PC to check the observatory status. All of this can be done easily and securely with EkosLive. Since it was designed with mobile in mind, you'll find its user interface particullay suited for tablets and phones.
What is Ekos Live?
Ekos Live is a real-time web application that can be run from any browser. It allows you to control many aspects of Ekos right from the browser. It is built around material-ui from Google, so it is very friendly for mobiles & tablets on any platform.
It supports capture, focus, guiding, alignment, and polar assistant tools. Furthermore, it can save your images directly to the cloud where they are stored along with a rich metadata system that enables easy search for images in the future. You can define your own tags to uniquely identifies images of interest.
Turn on sound notificaitons on to get audible alerts on tasks such as when an image is captured and so on. It supports multiple themes (Normal, Dark, and Night) to suit your seeing preferences.
Do I need to purchase StellarMate to use EkosLive?
No, StellarMate is not required. You just need KStars/Ekos to use EkosLive.
KStars FAQ
How to disable KStars from starting up automatically?
KStars automatically starts up on system boot. To disable automatic startup, toggle it off from EkosLive Dashboard at http://stellarmate.local
Alternatively, you can also disable it from the terminal:
systemctl --user disable --now org.kde.kstars
KStars is required to run StellarMate App. Therefore, if StellarMate App is used, it will launch KStars regardless of startup settings since it is required for the App to operate.
KStars Language Not Changing
Q: I changed the language in KStars, but the interface didn’t update. What should I do?
If KStars does not reflect your selected language, try the following steps:
- Open a terminal.
-
Run:
flatpak config --user --set languages "*" flatpak --user --reinstall install org.kde.kstars.Debug flatpak --user update - Restart KStars. (usually closing KStars, will autostart it again)
This forces Flatpak to enable all language packs and refresh KStars. After restarting, the selected language should be applied.
KStars can follow your system language, but you can still set a different language manually. The steps above help ensure all translations are available regardless of your OS language.
INDI FAQ
Why can’t I find an INDI driver in Stellarmate Web Manager?
Starting with SM OS 2.0, KStars and all INDI drivers are installed in a sandbox environment within a flatpak. However, the web manager only lists the System drivers, which are quite limited. To see all drivers, toggle the Driver Source to Flatpak to get a list of all INDI 3rd party drivers.
- Mounts FAQ
Why SkyWatcher 150i slews 180 degrees off?
Thanks to Alan Galitz for submitting this detailed HOWTO.
Brief Procedure
- Update firmware 150i Mount to 3.59.45 from 3.58 (download from Skywatcher Global site) - best done with USB printer cable
- Use SynScan App (latest version from global site), rather than Hand Controller to AutoHome Wave 150I mount
- Power OFF Mount
- Connect StellarMate and equipment
- Ideally connect StellarMate controller to Mount via mount USB (Mount internal USB path works well for this)
- Power up StellarMate
- Check/enter TIME, LOCATION, EPOCH (JNow likely best)
- Verify OTA/mount pointing at Home position set by AutoHome from SynScan APP (RA=0h Dec=90)
- Pier Side (Northern Hemisphere) = west pointing east (initial default)
- Proceed to alignment
More Details
Firmware Update
- Update firmware 150i Mount to 3.59.45 (17 Sep 2024) from https://www.skywatcher.com/download/software/motor-control-firmware/
- Firmware: MC030 Motor Controller, Version 3.59.45 - Download ZIP
- Best done via USB cable from Windows PC using Motor Controller Firmware Loader, Version 1.87
- While a wifi updater is available, users have reported incomplete updates. On an Asus NUC, the USB-A to USB-B (printer cable) update completed in ~20 seconds, though others reported longer times. Watch the Mount power light and be patient.
- Mac users can try the Mac version (v1.84) via the Wave 150i built-in USB port (not personally tested)
StellarMate Initialization Procedure
- Power On Wave 150i and let it establish wifi
- AutoHome the mount using SynScan App rather than Hand Controller
- Verify AutoHome is correct: RA 0, Dec +90
- Optional: Clear previous alignment data using SynScan App menu
- POWER OFF mount, leaving it in Home Position
- Connect and Power On StellarMate (see Power On Sequence below)
Source: Cloudy Nights Forum Discussion
Suggested StellarMate Power On Sequence
- 12V Source → ON (feeds to power boxes: PPBADV2 etc)
Wait 5–8 seconds (LED solid) - Mount (Wave 150i) → ON
Wait ~10 seconds (electronics ready, USB stable) - USB-only Accessories → ON (cameras, focuser, dew heaters via PPBADV2)
Do this before 12V & MeLE/PC/etc boots - Dual-power cameras (USB + 12V):
- Connect USB first (PC sees device)
- Then connect 12V (cooler/heater gets clean power)
- Wait ~5 seconds
- MeLE PC/StellarMate X/AsiAir etc → ON
Wait 30–60 seconds (Linux boot complete, devices enumerated)
Why is my mount not synchronized with the Sky Map?
For mounts to report their coordinates correctly and in sky with where they are really pointing the sky requires the following conditions to be met:
- Accurate time and time zone: This is usually automatically set by the StellarMate App. If not using the App, ensure the time is correct.
- Accurate location: This is usually automatically set by the StellarMate App. If not using the App, ensure the location is correct. Please note INDI uses 0 to +360 for longitude. For example, if your longitude is -85 degrees, this would be (-85+360 = 275 degrees) in INDI. Therefore, do not manually change the longitude as it is usually correct.
- Starting Position: Mount is powered up in its manufacturer's recommended home or park position.
Depending on whethet the mount is Alt-Az or Equatorial, the starting home position can be different, but in general:
- Alt-Az: Telescope level with horizon pointing North (Azimuth zero, North Hemisphere) or South (Azimuth 180, Southern Hemisphere).
- Equatorial: Counter-weights down with telescope pointing directly at the celestial pole.
Some mounts require preliminary alignment and settings via the hand-controller first before they can report any valid positions back to StellarMate. Refer to your mount manual for more details.
After initial connection, slew to mount to a nearby star at least 20-30 degrees away from the celestial pole then plate-solve with StellarMate to synchronize the moutn.
Never Synchronize the mount manually near the celestial poles as this would invalidate the mount's internal pointing.
How do I set a custom Home position?
While many telescope mounts have a default home position, some, like iOptron models, allow users to set a custom home position. It's important to remember that home and parking positions are distinct concepts, even though they might seem similar. They serve different purposes in mount operation.
Home Position:
- Reference point: This is usually a position in the sky, such as the north celestial pole or a specific star, that is used as a reference for aligning the telescope and tracking celestial objects.
- Alignment: It helps to ensure that the telescope is accurately pointed at celestial objects, allowing for precise observations.
- Tracking: Once aligned, the telescope can track celestial objects as they move across the sky, compensating for Earth's rotation.
Parking Position:
- Storage: This is a position where the telescope can be safely stored when not in use.
- Protection: It helps to protect the telescope from weather, dust, and other elements.
- Convenience: It often makes it easier to set up the telescope for future observations.
From StellarMate App, use the Mount Quick Controls (1) to see if you mount support Homing functions (2). If it is supported, slew your mount using the directional control to your intended target and then tap the Home icon and tap Set. This should save the current position as the Home position for your mount.
How to Connect to the Mount WiFi
Please watch the tutorial given below:
How to Configure OnStep Meridian Flip?
Learn how to configure OnStep Mount Meridian Flip to work with StellarMate. Check the guide for detail.
- Cameras FAQ
What is Fast Exposure?
Fast Exposure is an experimental features in all INDI Camera drivers. It enables client (e.g. Ekos) to take multiple exposures in a sequence without awaiting the client to request the next frame.
You can enable Fast Exposure by toggle it in the camera Options tab as shown below. You do not need to set Fast Count as it is handled automatically by Ekos.
In Ekos or App, take exposure as you normally would. For example, if you add a Job with 5 exposures, without Fast Exposure it works like this:
- Ekos asks camera to take 1st exposure.
- Camera takes exposure. Once done, driver downloads the image from the camera.
- The driver uploads image to Ekos.
- After Ekos receives an image, it requests camera to take the 2nd exposure and so forth.
With Fast Exposure enabled, the driver immediately starts the next exposure as soon as the image data is downloaded from the camera.
Therefore, the camera is always busy exposing and downloading data without any wasted time setting as IDLE.
I can't find driver for SBIG camera
It's right there! Check under Diffraction Limited manufacturer and you should see the SBIG drivers.
How to set High Gain mode on QHY cameras?
If supported by the camera, set the Read Mode property to the desired value. A value of 1 indicates High Gain mode.
- Focusers FAQ
How to use Celestron SCT focuser?
Celestron Focus Motor is supported in StellarMate. It can be connected either directly to the AUX port of the mount, or via USB cable to StellarMate.
If the focuser is connected via USB, then you need to select Celestron SCT focuser driver in your equipment profile in order to control it.
Connectiong via AUX is only supported in the Celestron Nexstar/GPS drivers as explained below.
StellarMate provides two different Celestron drivers:
- Celestron Nexstar/GPS driver: If focuser is connected via AUX port, this driver would automatically recognize the focuser and provides complete control for it.
- Celestron AUX/Evolution driver: This driver does not support control of the focuser via the AUX port, and therefore the focuser must be connected via USB and controlled via its own dedicated Celestron SCT focuser driver.
- Scheduler FAQ
How can I change a sequence status from "Completed" back to "Scheduled" in the Ekos Scheduler?
Once a sequence is marked as "Completed" in the Ekos Scheduler, it does not revert to "Scheduled" automatically. This behavior is by design, as Ekos is intended to manage imaging over multiple nights. The scheduler checks the capture status of images to determine whether a job is complete.
To restart a completed sequence, you have two options:
Disable Job Progress Tracking:
- Go to the Scheduler → Job Settings.
- Turn off "Remember Job Progress".
This allows the scheduler to treat the job as new and re-run it.
Move or Rename Captured Images:
- Move the previously captured images to a different directory or rename them.
The scheduler will no longer detect the images as completed, and will schedule the job for execution again.
These steps will enable the scheduler to restart the imaging sequence as needed.
- Calibration FAQ
Can I take dark flats at a different time than the flats, or do they need to be captured in the same session?
Yes, you can take dark flats separately from the flats, as long as certain conditions are met:
Match the Exposure Duration:
The dark flats must be taken using the same exposure time as the flats. For example, if your flats were taken at 0.002 seconds, your dark flats should also be taken at 0.002 seconds.
Match the Sensor Temperature:
For best calibration results, ensure that the dark flats are taken at the same sensor temperature as the flats.
While the Ekos Capture Module can auto-generate dark flats during the same session for convenience, it is not a technical requirement. You can manually capture dark flats at a later time — just make sure the duration and temperature conditions are replicated accurately.
- Weather Stations FAQ
Why do I still see yellow or red weather status codes even when all my parameters appear to be in the “green”?
If your weather outside is clear and all parameter values are within the expected range, but you're still seeing a yellow or red status code, there's a specific setting you should check: "Flip alerting to in-bounds."
You may have already adjusted the following settings:
- OK Range Min/Max
- % for Warning Threshold
However, the "Flip alerting to in-bounds" option controls how the system interprets whether high or low values are desirable for each parameter.
Here’s how it works:
- Enable "Flip alerting to in-bounds" for parameters where higher values are better (e.g., temperature on a hot day).
- Disable it for parameters where lower values are better (e.g., cloud cover on a clear day).
Make sure to configure this setting individually for each weather parameter. Once correctly set, your system should report a green status code during favorable weather conditions.
- Observatory Controllers FAQ
How to Use the SVBONY SV241 Pro?
Learn how to use the SVBony SV241 Pro effectively with StellarMate in this HOWTO guide.
Need more help?
Contact us