1. StellarMate X
Warning
NEVER LOOK AT THE SUN WITH YOUR TELESCOPE OR CAMERA WITHOUT APPROPRIATE FILTERS IN PLACE. PERMANENT AND IRREVERSIBLE DAMAGE TO YOUR EYES AND YOUR EQUIPMENT WILL OCCUR.
StellarMate X is a compact and powerful Astrophotography Controller that supports numerous Mounts, Cameras, and other astronomical equipment. Powered by Open Source technologies and designed and built by Astrophotographer for Astrophotographers.
It provides unparalleled freedom in selecting your favorite platform to remotely control your equipment. You can use Ekos astrophotography tool on Windows, MacOS, or Linux. Furthermore, use StellarMate App on iOS and Android to automate your complete astrophotography workflow.
1.1. Key Features
StellarMate X is simple:
Connect your equipment (Mount, Camera, DSLR, Focuser, Filter Wheel, etc.) to StellarMate X via USB or WiFi
Connect to StellarMate X from either your Mobile, Tablet, or Laptop/Desktop Computer
Start controlling your observatory and image from any major platform
StellarMate X is quiet with no moving parts. It is four times faster than its predecessor StellarMate Plus and comes with double the storage and memory capacity enabling fast and seamless control for the most demanding and high-resolution astro cameras. It features a special VESA mount to secure it to standard dovetails and clamps.
1.2. Quick Setup
The following is the quick startup guide to getting StellarMate X up and running in a few minutes using your phone/tablet:
Download Stellarmate App from the Android/iOS store.
Launch the App and Register an account.
Connect the power adapter to StellarMate and turn power on.
Open network settings in your phone/tablet and connect to the StellarMate WiFi hotspot.
Open StellarMate App. Go to Setup tab. Click Rescan.
After StellarMate is detected, click on it.
Start the default Simulators equipment profile or create a new equipment profile.
Go to Ekos tab and start using your equipment.
Check StellarMate network settings and status from the Device tab.
1.2.1. Ports
StellarMate runs few back-end services that use the following ports.
SSH |
5624 |
Not Required |
INDI Web Manager |
8624 |
Required |
INDI Server |
7624 |
Required |
Ekoslive Server |
3000 |
Required |
Web VNC |
6080 |
Not Required |
VNC |
5900 |
Not Required |
NetBIOS |
139 |
Not Required |
Samba |
445 |
Not Required |
1.3. Package Contents
Thank you for purchasing StellarMate! Please follow this guide before you starting using your StellarMate Gadget.
After unboxing your package, you should have the following items:
StellarMate X Unit.
USB-C Power Supply with international socket adapter
Quick Start Guide.
VESA-Mount
Optional plug depending on the region.
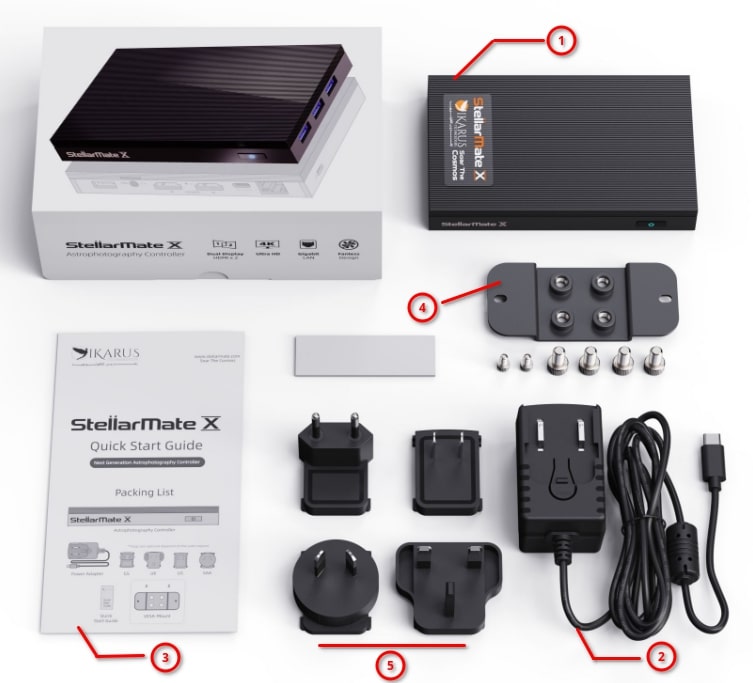
Connect the USB-C power supply cable to StellarMate X and then turn power on. There is no need to push the power button as the unit automatically boots up when power is connected. A soft blue light indicates the unit is powered up. Startup time should take less than 30 seconds after which the unit is ready to be used.
1.4. Getting Started
For detailed setup instructions and tutorials, visit our YouTube Channel.
1.5. Specifications
StellarMate X leverages a passive cooling technology, and has a good thermal dissipation to prevent overheating. No fan no noise, reaching a totally silent, dust free performance:
CPU: Intel Gemini Lake Celeron J4125 Quad-Core
GPU: Intel HD Graphics 600
Operating System: StellarMate OS
Memory: 4GB/8GB LPDDR4
Storage: 64GB/128GB eMMC Built-in
Expandability: Micro USB up to 2TB, M.2 SSD/NVMe 2280 up tp 4TB
4x USB 3.0 Ports
2x HDMI 2.0 port, support 4K@60Hz
1x 3.5mm Audio jack
1x Gigabit LAN Port
1x Kensington Lock Slot
1x USB Type-C (Only for power supply)